
PAX User Guide
IN THIS ARTICLE
Unboxing and Powering On
Connecting to Wi-Fi
Logging into the SaffireTix App
Connecting to a Printer
Updating the SaffireTix App
System Reboot Countdown
Exiting Firmware Download Mode
RELATED ARTICLES
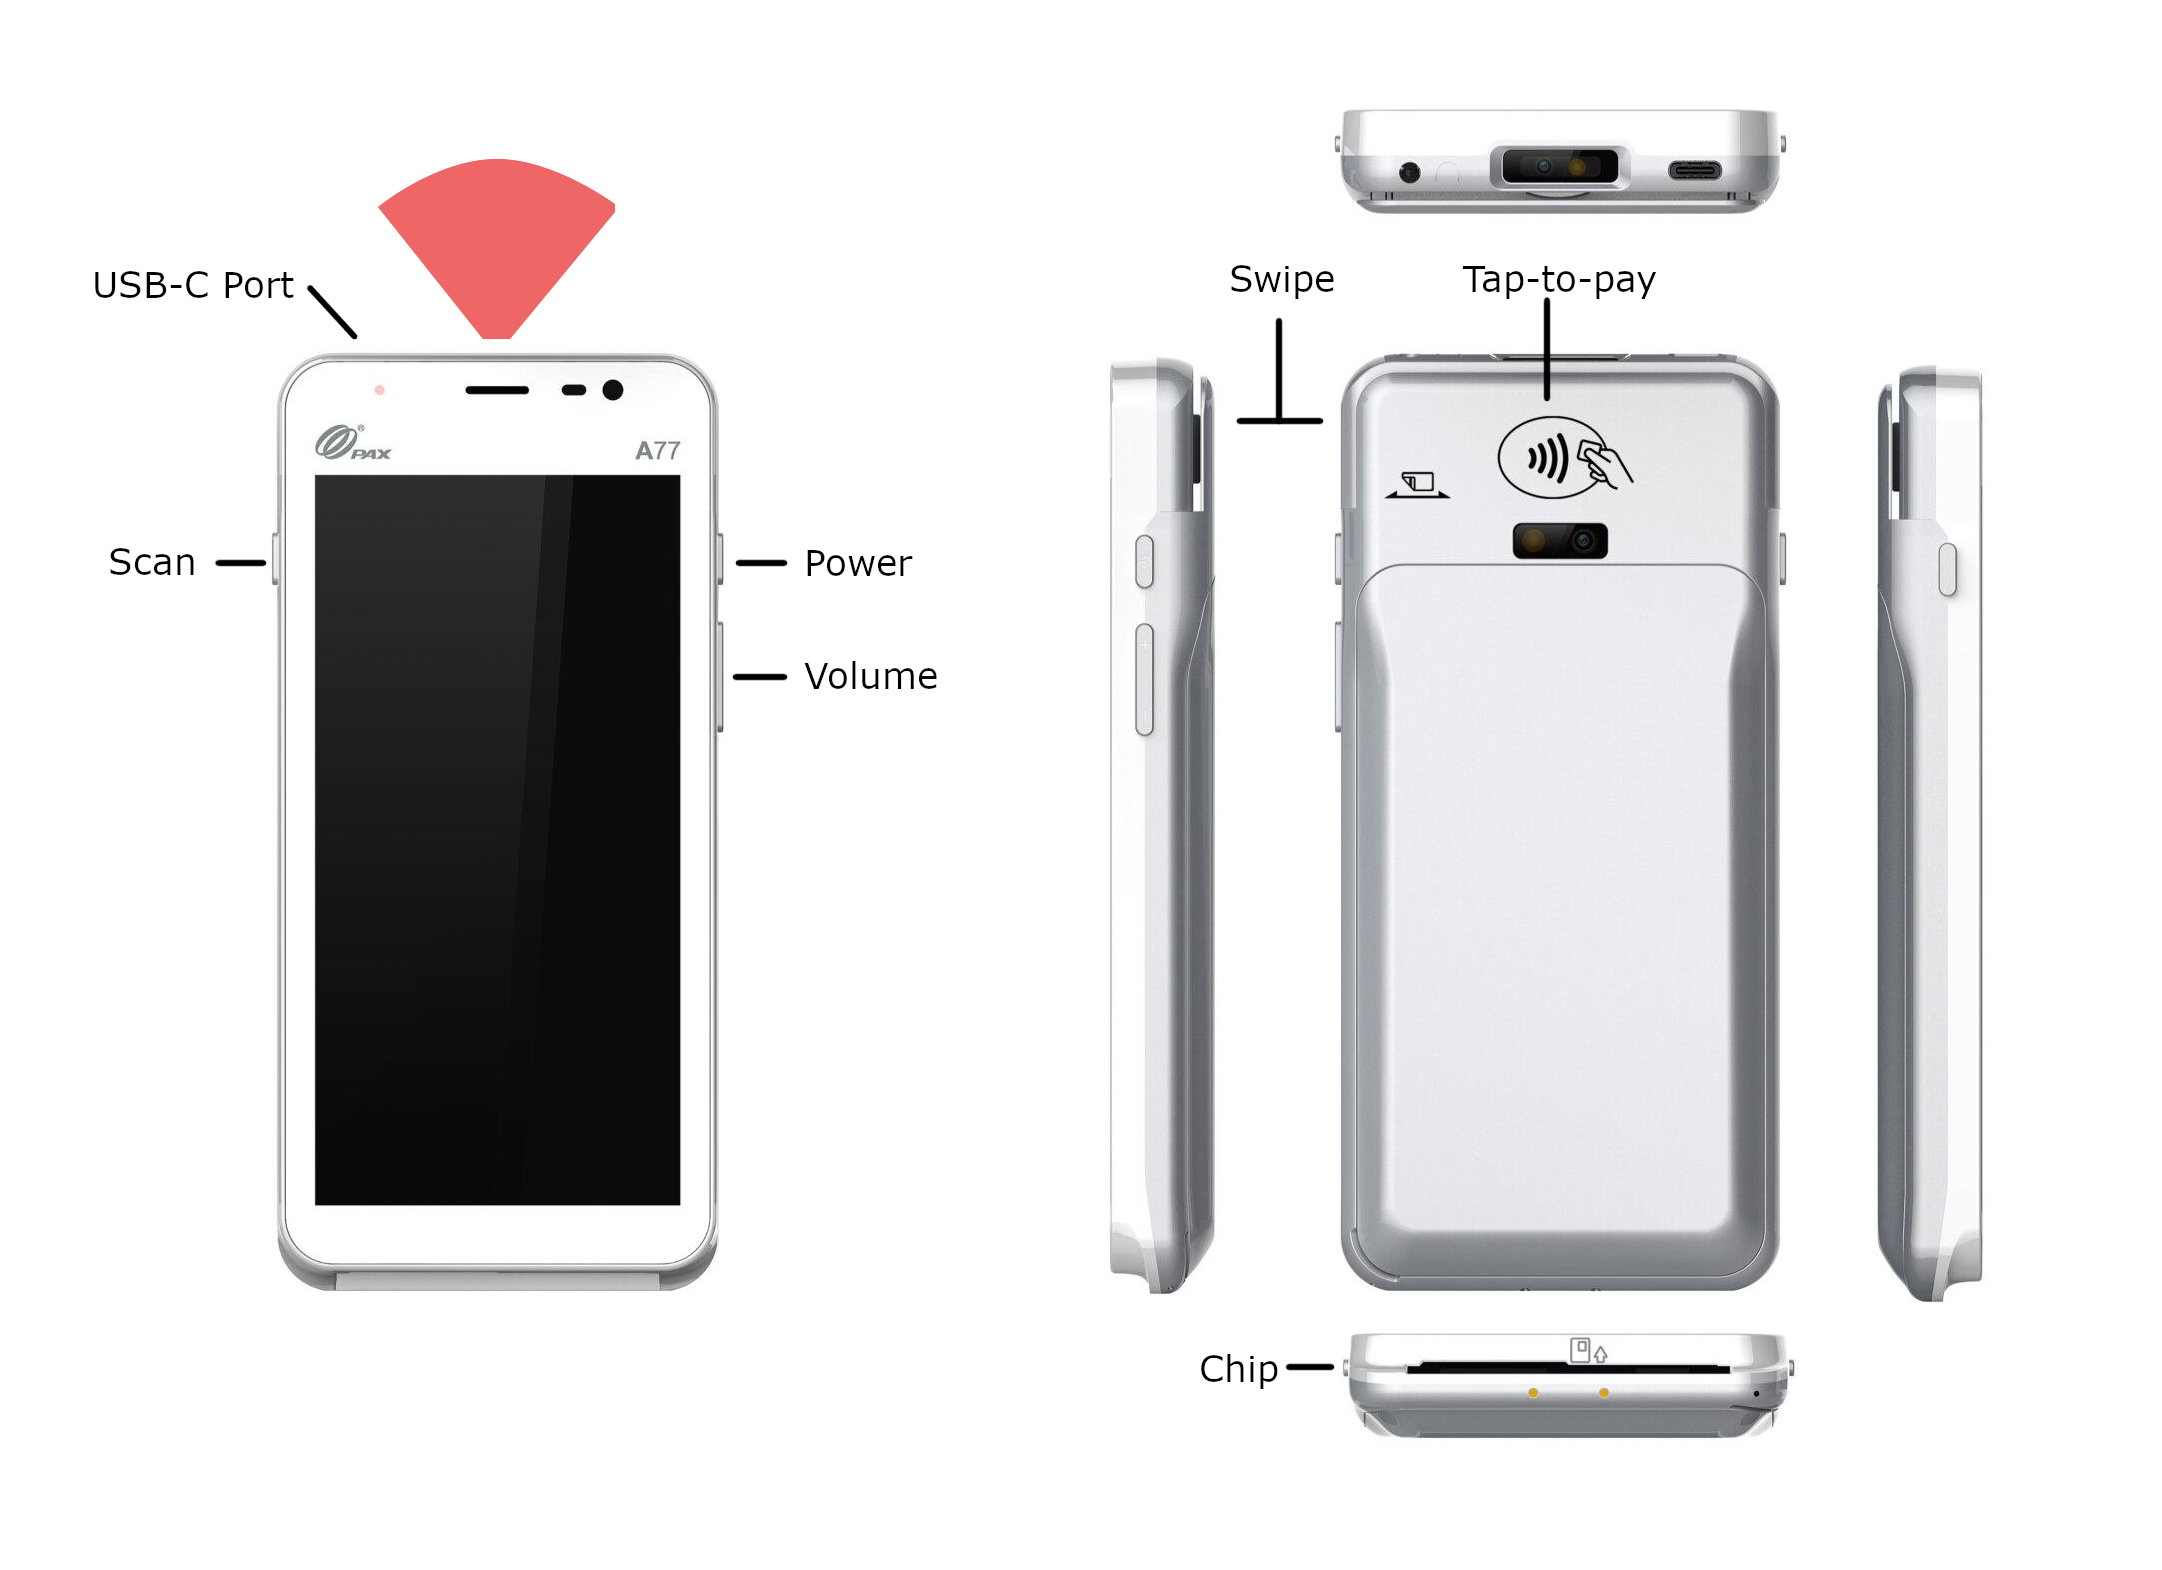
The PAX A77 Scanner is a versatile handheld mobile computer, ideal for ticket sales and scanning at events. It has built in card readers that support swipe, chip, and tap-to-pay transactions. This guide will walk you through setting up the device and maintaining your device for optimal performance.

The PAX device does not have a built-in printer, so if you require ticket/receipt printing, you will need to add Star (hip) printers to your equipment plan.
Unboxing and Powering On
- Unbox your PAX and confirm that all components are present:
- PAX device
- Battery (installed)
- USB A to USB C charging cable
- USB A charging block
- SIM card (pre-installed)
- To power on, press and hold the power button located on the side of the device until the screen lights up.
Connecting to Wi-Fi
To use the SaffireTix app for ticket sales and scanning, connect the device to a Wi-Fi network.
- Swipe down from the top of the screen to access the Quick Settings menu.
- Tap the Wi-Fi icon and select the desired network from the list.
- Enter the network password (if applicable) and tap Connect. Once connected, the Wi-Fi symbol will appear in the status bar.
Logging into the SaffireTix App
The SaffireTix app allows you to both sell and scan tickets at events using your PAX handheld scanner. We provide two ways for you to log in to the SaffireTix app:
- Spark email and password
- Enter your Spark username and password on the app login screen to scan/sell from your account.
- Event URL and PIN (with QR code option)
- Enter your event URL and your user Device Login Pin Code. See instructions to set/find your device login pin code on the Mobile App User Management page.
- QR Code login option
-
To log in with a QR code, select the PIN option on the login screen.
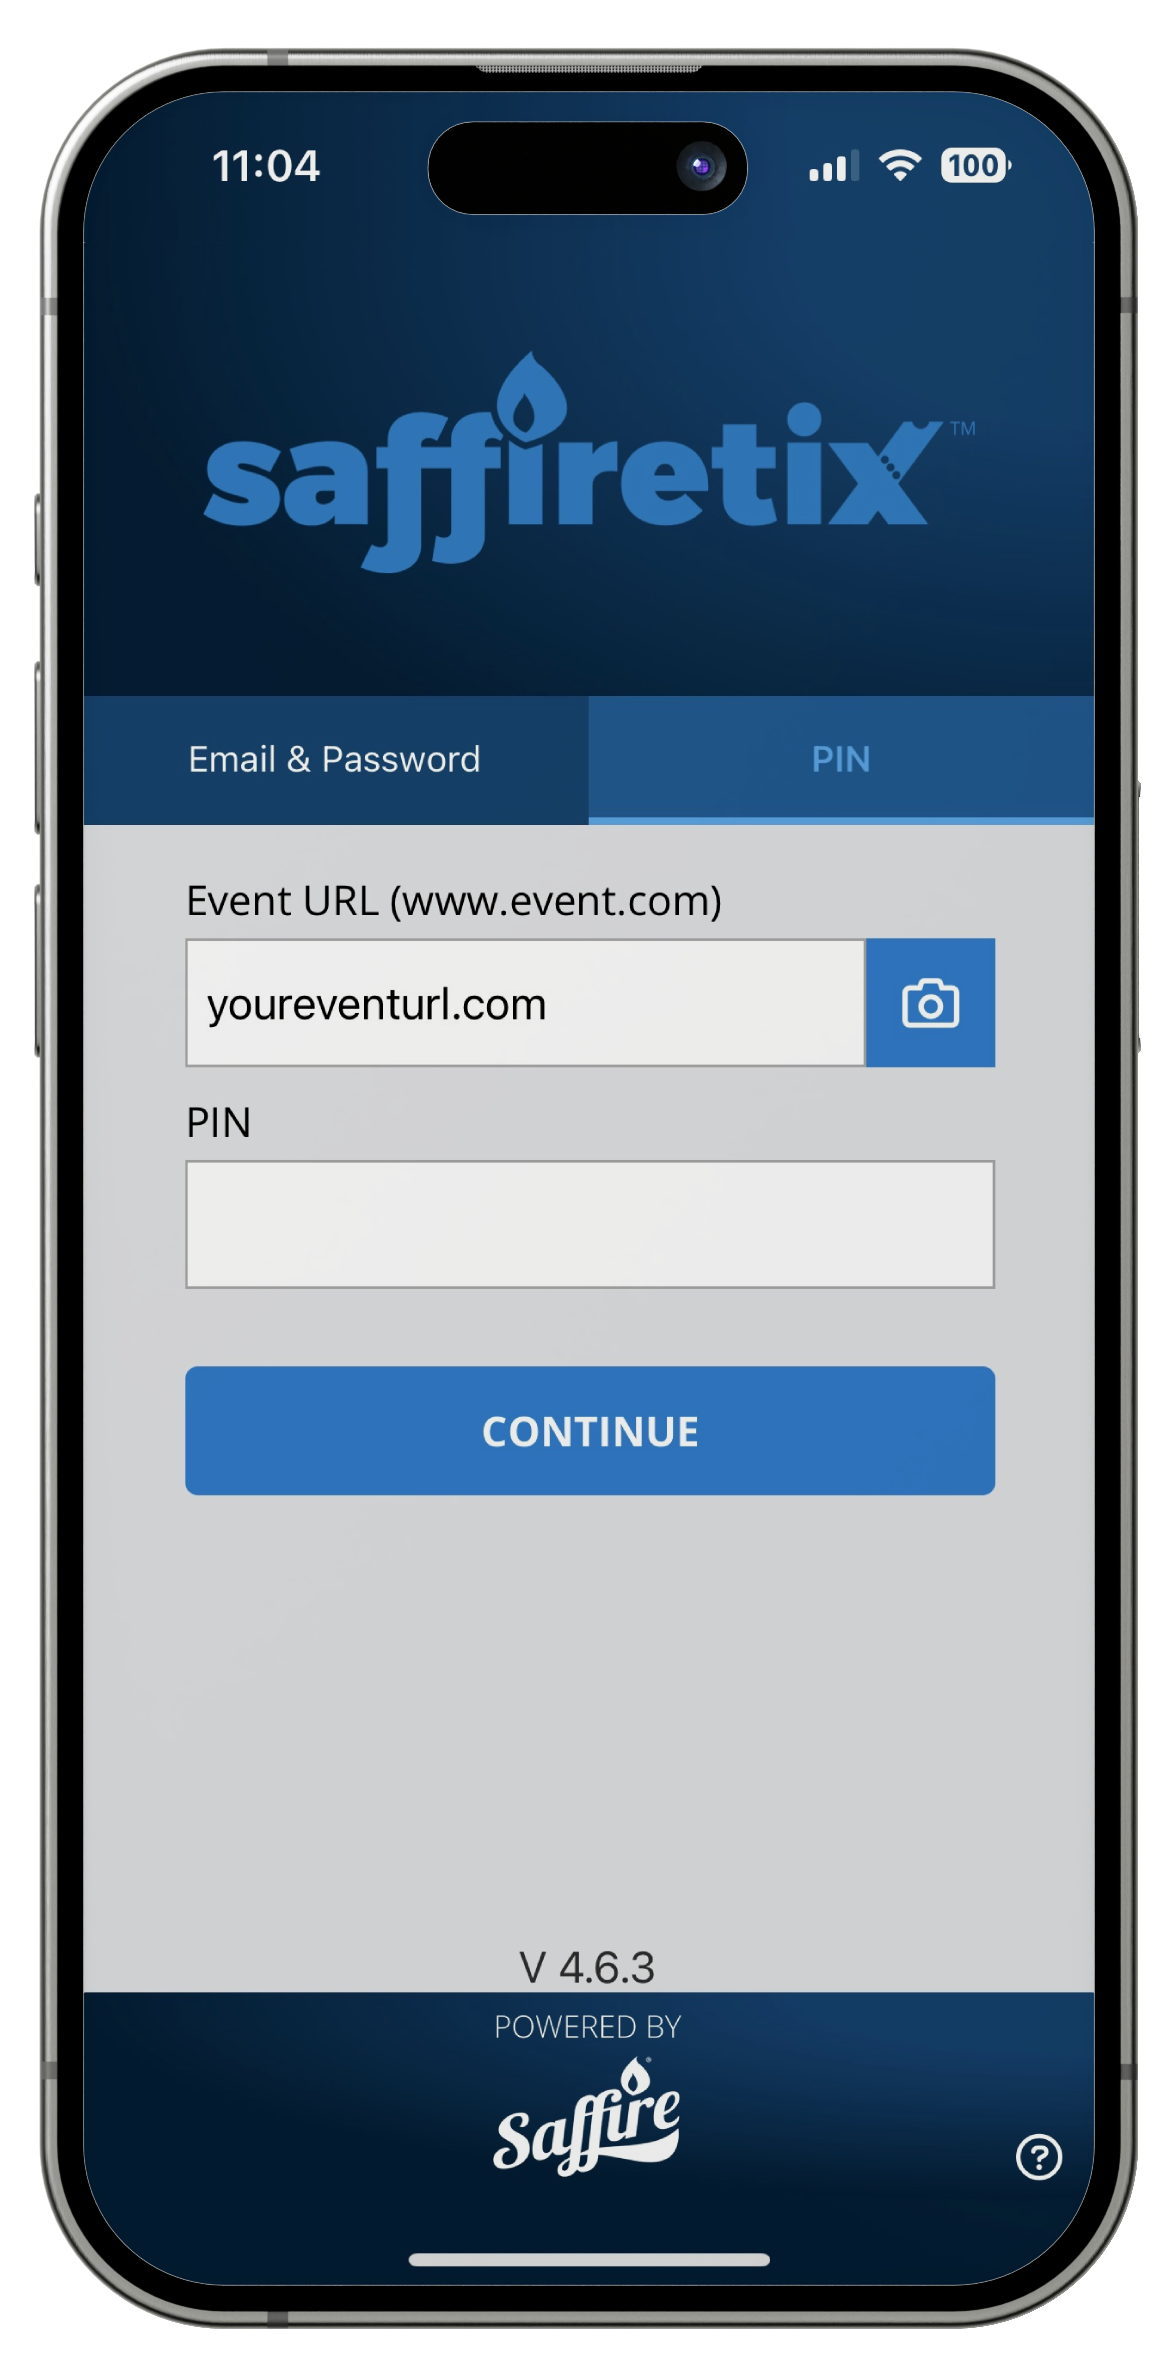
- Tap the camera icon at the right of the Event URL text box.
-
Scan the QR code provided with your equipment shipment. You can find it both on the inside flap of the shipment box, and in the blue event documents folder.

-
If you can't find your event QR code, you can print it out from your Spark account. Navigate to Commerce > SaffireTix > Site QR Code. You can print the code and post it where needed for easy scanning. The code will not allow login without a PIN, and can be shared without causing a security concern.

-
- Make sure the device is connected to the internet for real-time updates and access to event data.


Connecting to a Star (hip) Printer
To print tickets and receipts you will need to connect a Star mobile printer.
- Open the Settings app on your device (password 9876).
- Select Connected Devices and then Bluetooth.
- Find your printer in the Available Devices by identifying the Serial Number or Asset Tag number, and connect to the device. The printer password will be 1234, 0000, or match the asset tag number on the printer.
- Close settings and open the SaffireTix app.
- When logged in, navigate to settings, and find the Printers section then tap Change.
- Choose the appropriate printer.
- You should now be able to print receipts from your hip printer.
Please visit the Star Hip Printer User Guide for further info.
Updating the SaffireTix App
SaffireTix devices are always sent to you with the most recent version of the SaffireTix App, however if you've been advised by your Account Manager that the App needs to be updated while you have the devices onsite, follow these instructions.
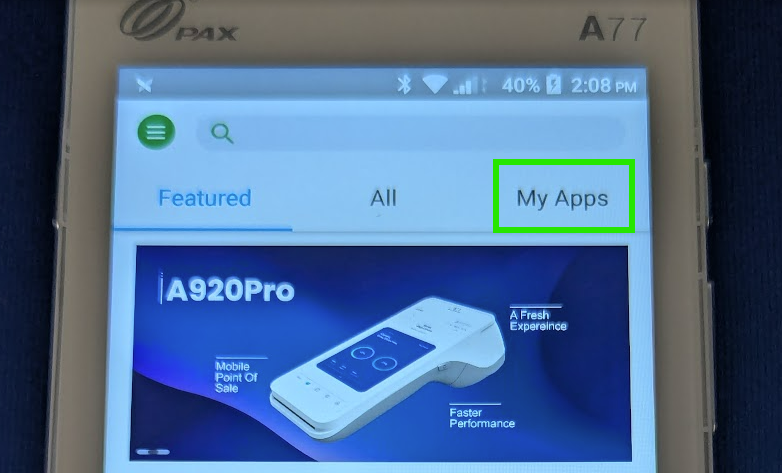
-
Open the Pax Store App

-
Click "My Apps"
-
Click Update on the SaffireTix App.
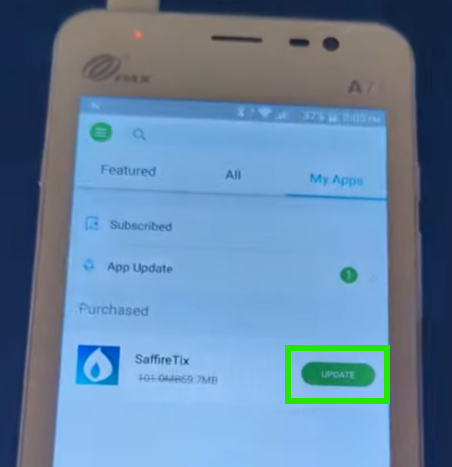
- Close the Pax Store App. You should now be able to open and use the SaffireTix app as normal.
- When you've finished updating, we recommend running a test transaction on each device or, at a minimum, verifying that each device reaches the payment screen by adding an item to the cart, selecting Credit Card, and confirming the system prompts for a swipe. This step will help us catch any potential issues early. While problems are unlikely, it is always best to verify functionality ahead of an event to avoid any unwanted surprises on-site.


System Reboot Countdown
Occasionally, you may see a message pop-up on the PAX device that say's "System reboot countdown", after which the device will reboot.
PAX devices have a built-in security requirement that forces them to restart once every 24 hours. When that scheduled reboot is about to happen, the device shows the countdown on the screen. It’s normal behavior for all PAX A-series devices and is handled entirely by the device’s operating system, not the SaffireTix app.
To prevent this from causing down-time at your events, we recommend powering down the devices to charge overnight, then powering them back up at the beginning of your daily use.
Exiting Firmware Download Mode
Sometimes when a device is turned on it will get stuck on the boot screen with a message that says Firmware Mode or Download mode. This usually happens when a volume button is accidentally held down along with the power button when powering on the device. To exit download mode, follow these steps:
- Locate the Power button (usually on the side) and the Volume Down button (also typically on the side).
- Press and hold both buttons simultaneously.
- Continue holding the buttons for several seconds, often 7-10 seconds. The device should restart, and you should see the home screen or the operating system's boot screen.
- Once the device restarts and you see the home screen, you can release the buttons.
For further device details, visit the PAX Quick Setup Guide on https://www.pax.us.