
Managing Users
IN THIS ARTICLE
Add a Spark Admin
Add a SaffireTix User
Add a Standard User
Import/Export SaffireTix Users
Deactivate/Reactivate a User
Managing any type of user is handled within a single popup window. You can control whether the user is an Admin, if they have SaffireTix access (on applicable sites), if they have Member access (on applicable sites) or if they're a customer with a stored account.
- Admins can have varying levels of Spark access.
- SaffireTix users can be limited to specific selling or scanning locations and prohibited from Spark access entirely. These users can be added individually or through a mass import.
- Your customers (standard users) can only access their personal order history and tickets.
Spark location: Tools > Users
Add a Spark Admin
Add User
Click the ADD USER button near the top of the page to open the following window:

Select Admin at the top of the window. First Name, Last Name, Email address, and Password are required fields. Email signup is optional - this will add the user to your email list.
Use 12321 as the password for ALL new users... the system will require the user to change the password the first time they access Spark or Box Office.
Clicking Save & Continue moves you to the Access tab.
Account Info tab
This tab stores optional information. The data is accessible only within the Users panel.
Access tab
This tab allows you to designate the user as an admin and/or a member (if this functionality is part of your site), and you can allow SaffireTix access. At least one site section must be selected. For adding new employees, select the appropriate access to admin settings.
- This Person is a Member - This only appears on sites with Member tools installed. Click here for details.
- This Person is an Admin - check this box to allow the user to access Spark. Once checked, the screen will refresh and you'll be able to select the access rights.
- Admin Access Rights - check the boxes for the sections of Spark this user needs to be able to access. Once checked, additional access levels may populate. At least one section is required to ensure the admin has access to something within Spark.
- Device Access Rights - check this box to give the user login access to a SaffireTix™ device (this may not be enabled on your site). Once checked, the screen will refresh and you'll be able to choose whether the user can cancel and/or comp orders.
Be careful about who you give Users access to! Once a user is permitted to access Users management, they are able to add additional access rights to their own or other user accounts.
Click Save & Close.

Add a SaffireTix User
This only applies to sites utilizing SaffireTix.
Add User
Select SaffireTix at the top of the box. First Name, Last Name, Email address, and Password are required fields. Email signup is optional - this will add the user to your email list.
NOTES
- You can make a generic account like "Ticket Scanner" and all of the employees and volunteers that will be scanning at your gates can be logged in as the same user. As long as you have your different locations set up, your reporting will provide that extra layer of data.
- However, if you want your ticket sellers to have individual logins to the app, you'll need to set up unique accounts for each user.
Account Info and Access tabs
These are not used for SaffireTix users and are automatically bypassed.
SaffireTix tab
For faster logins to the app you can add a Device Login Pin Code. This is optional.
It is essential to select the location(s) appropriate for the user. Any number of locations can be selected, but without at least one chosen, the user won't be able to use the app.

If the user needs to be able cancel orders or comp orders, step back to the Access tab and choose the appropriate Device Access Rights.

Add a Standard User
This user type represents one of your customers. They can store their purchase history and tickets. Customers have the option of creating a user account after completing an ecommerce transaction.
Import/Export SaffireTix Users
This only applies to sites utilizing SaffireTix.
These features are available from the More button near the top of the dashboard.
Click here for step-by-step instructions
Deactivate/Reactivate a User
If you need to remove Spark or SaffireTix access from a user, you can do this by Deactivating the user. Hover over the User name and select Deactivate.
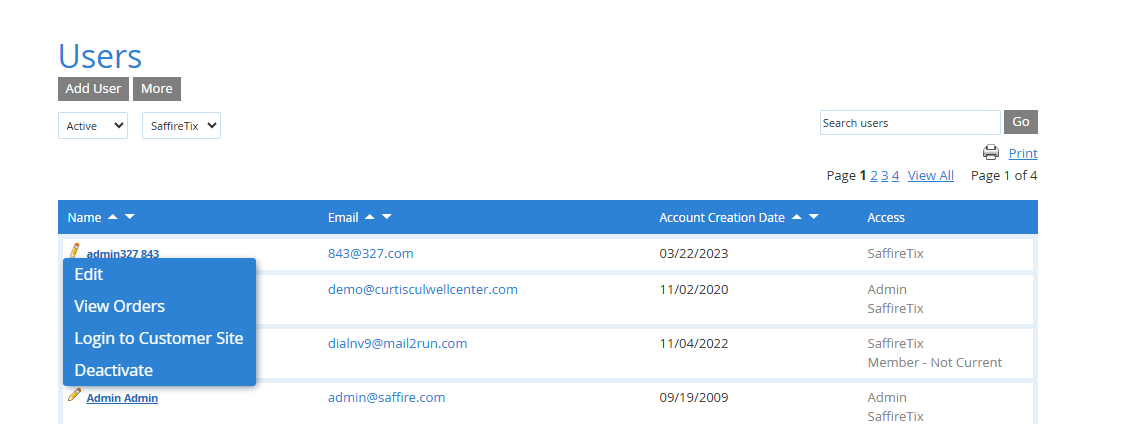
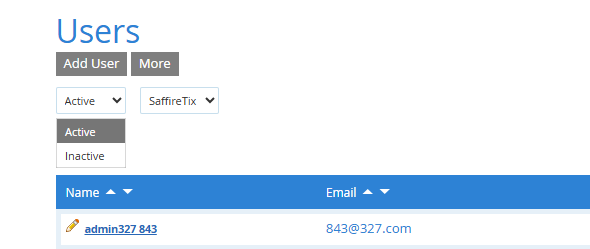
Once deactivated, it is possible to delete or reactivate a user. This can be helpful for updating site access for seasonal employees. To activate or delete a user, use the dropdown box near the top to select Inactive users.
Hover over the users name and select Activate or Delete.