
Selling from a Map
IN THIS ARTICLE
Post Purchase Options
Placing Pins For Sale
Display Examples

You can use a Map module for selling locations... for example: tables at an event, booth spaces at a market or trade show, stalls for horses and livestock, or spaces for RVs. This functionality is dependent on having a payment gateway integrated with your site. If you'd like to know more about setting up ecommerce, please contact the Saffire support team.
Before you begin
You'll need to add a Map Module to the page of your choosing, and you'll need products created for selling on the map. If you're not familiar with the Map Module, you'll want to review the Map Module article before going any further with the following steps.
Also, depending on the product(s) you're selling, you may need to review one of the following articles to get your product(s) set up:
Post Purchase Options
Once you've created your Map Pin Categories, go to the PowerDots and Edit a category.


Under Post Purchase Options, make your selection based on the following descriptions:
- Remove Pin - the pin will be removed from the Map after purchase.
-
Display as Purchased - pin will remain but will be marked as "Purchased" and the Buy Now button will disappear.
You can modify the "Purchased" text in the Custom Purchased Text field
-
Display Purchaser Name - pin will remain but will be marked as "SOLD" and will display the purchaser name specified during checkout.
This is most commonly used for Trade Shows, Exhibits, and Gala Seating.
Placing Pins For Sale
Adding pins to the map is simple!
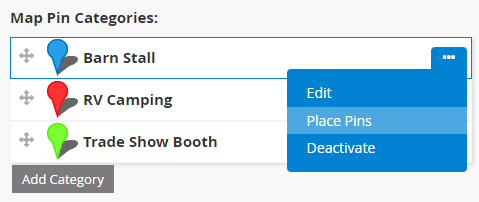
- Click the PowerDots (ellipsis) on a pin category and select Place Pins
- The map image will open in a new window and will zoom-in for ease of placement. Scroll bars will be available for navigating the image. Click to place your first pin as needed.
- Hover over the new pin and select Edit.
- Select the For Sale option.
- Find product in library, either by searching for the product by name or filtering for specific categories/subcategories.
Make sure you click Select to pair the product to the pin. - Add the Space Name if it needs to be identified differently from other pins in the category
- Select if the space is Available or Sold (typically used for spaces you are reserving but still want displayed on the map)
- Click Save & Close

Once your first pin has been added to the map with the product tied to it, you can hover over the pin and select Copy. 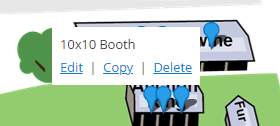
Confirm pin details are complete, and click on the map to place additional pins with identical settings.
Be sure to update the Space Name for any pin that needs to be identified differently.
When you're finished placing pins click FINISH COPYING.
Close the Map window and Save your page.
Display Examples
For Sale
Locations which are set as For Sale will display with a dollar sign ($) next to the pin.

Post Purchase Option - Remove Pin
The pin will simply disappear from the map.
Post Purchase Option - Display as Purchased

Post Purchase Option - Display Purchaser Name

