Adding Commerce Products
IN THIS ARTICLE
Get step-by-step
instructions for other
types of for-sale products:
General Admission Tickets
Reserved Seating Tickets
External Products

SaffireCommerce™ products are non-ticketed items, meaning there is no unique QR code generated upon purchase - only a receipt. Popular uses for this functionality include sales of merchandise products, registration fees, deposits, and donations.
This does require integration with a payment gateway, so check with Saffire Support if you have any questions.
Spark location: Commerce > Products > Add Product
Note: SaffireCommerce products are only accessible online. You cannot access these products through the Box Office to make a sale. If you would like to have it accessible through the Box Office, you would need to create a General Admission product. Here is an article to create a General Admission product: Click Here
Add Product
Presuming you already have a payment gateway integrated with your site - yet not using SaffireTix™ - you'll see these options at the top of the page:

If you are using SaffireTix for general admission ticketing you'll see this:

And if you plan to use SaffireTix for reserved tickets you'll see this:

Regardless of how the top of your screen appears, you need to set the Product Type to SaffireCommerce. NOTE: This is the only field which cannot be modified after you've saved the product. If you accidentally select the wrong type and save it, you'll need to delete the incorrect product and start over.
Follow these steps to create your product
- Add a unique Product Name
- Select or add a new Category
-
Add a Website Description for the product. This is optional, yet highly recommended, especially if there is an incentive or discount or specific instructions for the customer during checkout

- Add the Price
- if you select Set Price, you will enter in the exact $ amount
- if you select Free Form Price you can allow your customer to enter in the amount they want to pay/donate, etc. However, you can control the minimum and maximum your customer is allowed to enter in the free form price field.
-
Add or create a new Product Fee (optional)
This fee will be multiplied by the quantity of this product your customer purchases
Once you've selected the Product Fee name, you can choose a dollar ($) amount fee or a percentage (%) amount fee

Upselling allows you to recommend additional products to the customer during checkout.
- This is optional. Full details on this feature is available in Product Upsells
- Click the Search/Add Upsell Products link to search for existing products.
- Search for the product by Category or Name
- Check all products that apply and click Add Products to save.
NOTE: Commerce products with a free-form price cannot be added as upsell items.

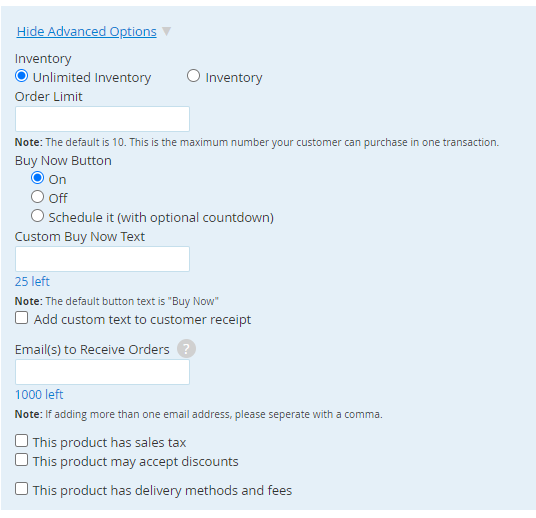
Show Advanced Options
All of these are optional - the default settings work for most scenarios
-
Choose either Unlimited Inventory or set an Inventory limit.
A Total Quantity field will open after clicking theis option.
-
Enter a maximum Order Limit. The default is 10, you can increase/decrease as needed
This will be the total quantity of this product a customer can add to their cart in a single transaction -
Choose whether the Buy Now Button is On (recommended), Off, or Scheduled
If you select Schedule it, you can enter the dates this product is available for purchase and add a countdown if it isn't on sale yet. The countdown will be set individually with each product and ends when the tickets go on sale online.
-
Custom Buy Now Text allows you to edit the button displayed when purchasing.
Popular Examples of Custom Buy Now Text: Donate, Book Now, Register
-
Add custom text to the receipt can be utilized when you need to share important information
Example: "Bookings are not complete until you receive confirmation from our facility"
-
The Email(s) to Receive Orders field allows you to add additional recipients of order confirmations containing this unique product.
This field should be used when sending product specific order confirmation emails to additional recipients. Tools > Site Settings > Account houses both a default address and additional emails to receive copies of all order confirmations.
- Check each applicable box if this product should have sales tax, accept discounts, or has delivery methods and fees
-
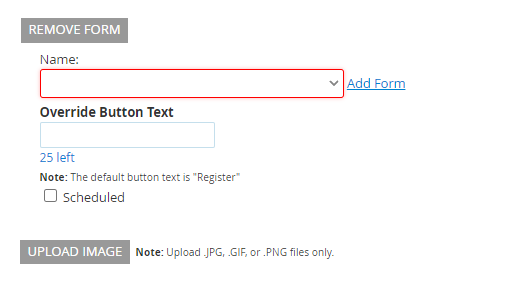
If your commerce product should be paired with a Form for completion prior to completing the transaction, click Add Form- Select the appropriate form the drop-down or a Add Form- Use the Override Button Text field if you would like to change the default button text

If you've created the form, but do not see it in the drop-down list, the form may be inactive OR it may contain a module with Items for Sale. Forms can be either attached to a product or you can include a product within a form - but it can't do both (it would create an endless loop).
-
Upload Image will display your unique photo in the Items module on the web page

- ClickSave in the Tools box at far right.