
Add a New Form
IN THIS ARTICLE
Initial Setup
Options
Adding Form Items
Thank You Message
RELATED ARTICLES
Form Items
Forms Dashboard
Selling Through a Form
Exporting Submissions
Forms Module
Ready to add a form to your site? This is the starting point. The first thing you need to determine is whether you intend to add (embed) the form in another page, or if you want to link directly to the form page.
This decision may impact your use of the text boxes available in the form setup. Pages with embedded forms are much more flexible because you can add standard content modules and manipulate the sections. So any text accompanying the form may be better presented on the host page.
If you need help with the setup, please check with Saffire Support.
Spark location:
Tools > Forms > Add a New Form
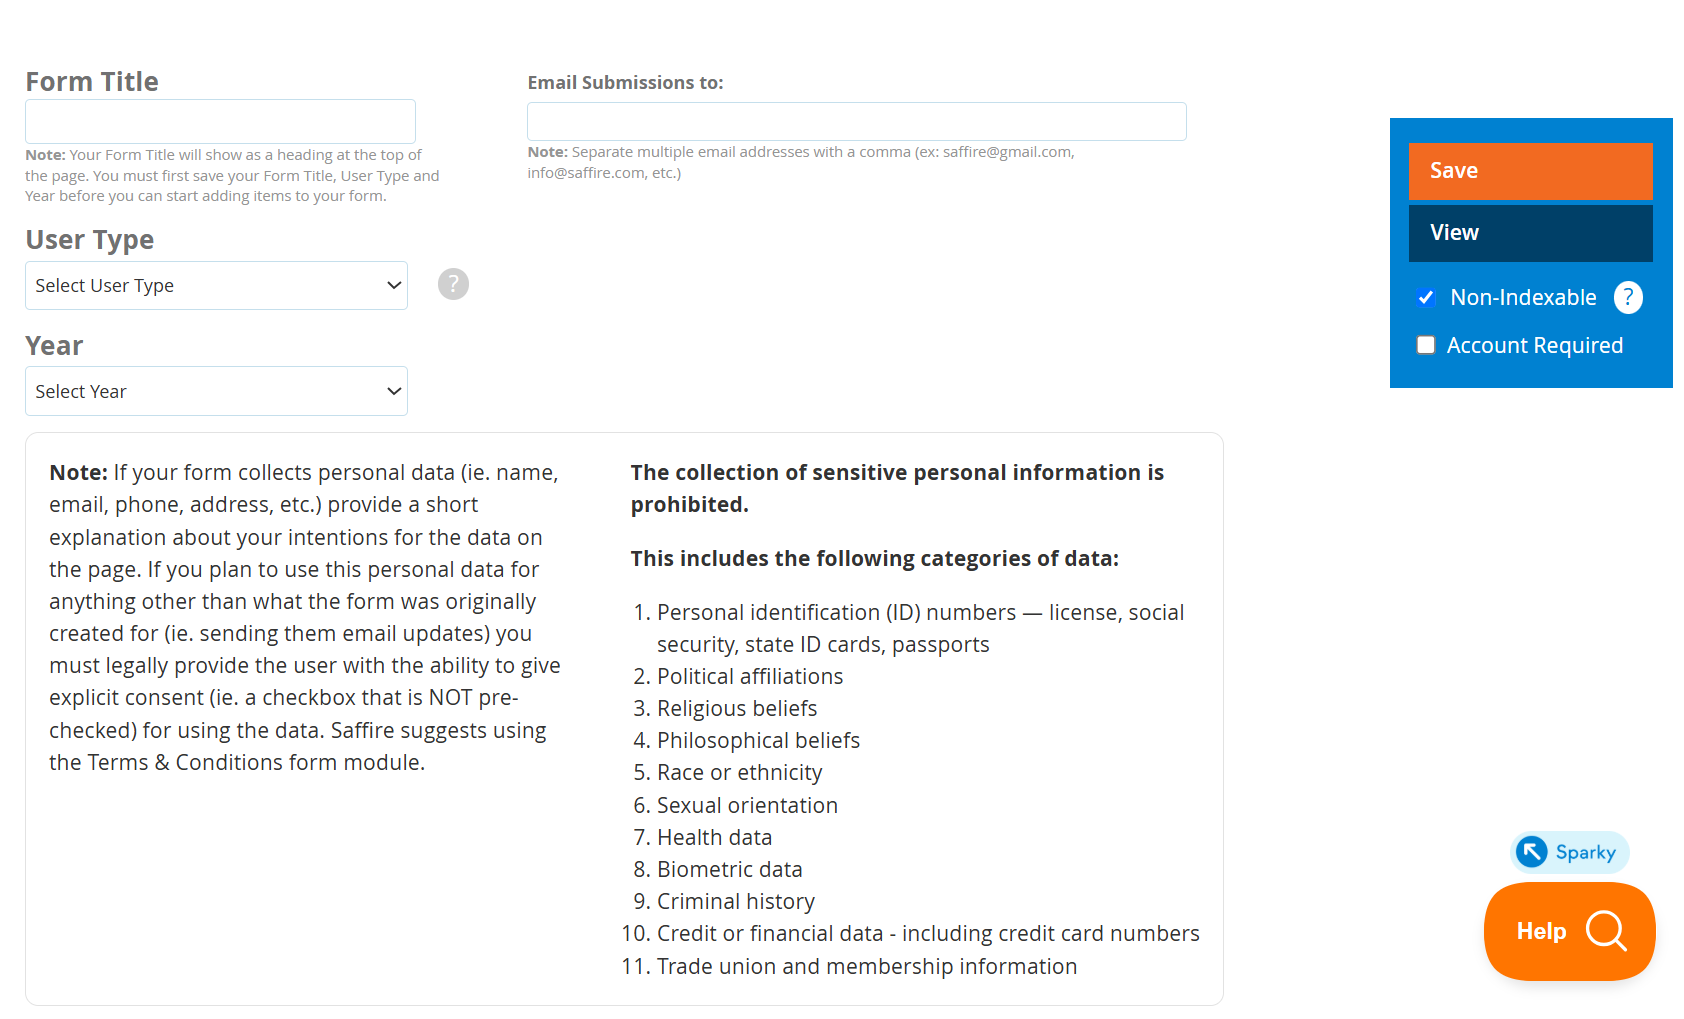
Initial Setup
- Form Title is required - this will show as the page heading
- User Type is required - selecting the correct user type is important to ensure the form's data is stored in the correct location in your admin site for future use.
- Note: User Type cannot be modified after saving the form.
- Customer - forms pertaining to event patrons and attendees
- Member/Volunteer - forms pertaining to individuals who work for and/or are associated with your event
- Sponsor - forms pertaining to individuals, businesses or organizations who donate goods and/or services to your event in exchange for recognition
- Vendor - forms pertaining to individuals, businesses or organizations who will be selling goods and/or services at your event
- Year is required - this will associate the form with a specific year
- Email submissions to: is not required. If no address is added, no one will receive notifications, but form submissions will still be stored and available or export. You can enter multiple addresses - just separate them with commas.
- By default, new forms are checked as Non-Indexable. Leave this box checked if you want to keep your form hidden from search engines. Uncheck the box if you want the form to be included in search engine results.
- Please note: If a form has already been indexed by search engines, changing it to Non-Indexable will not immediately remove it from search results. The update depends on how frequently search engines crawl and update your website.
- check Account Required if you want to require users to have accounts on your site in order to access the form
- The View button will be activated after you've saved the form the first time
Options
After saving the form, these additional tools will be activated:
- Export Submissions | Print Submissions - the data exports as a CSV file. The print option allows you to select specific submissions.
- Enable spam protection - this is on by default and we recommend leaving it activated
- Limit # of submissions - you can set a maximum number of submissions the form will accept. If this form is tied to a product that has an inventory, the inventory will override the form limit.
- Edit Submission limit response - this is an on-screen message which appears when the limit is reached
-
Text above form - this space is provided for details and instructions. If no text is added, this space will not appear on your form. Note: If you're planning to embed the form in another page using the Form Module, you might want to use content modules on the host page to add your details and instructions.


Saffire forms cannot be used to collect sensitive data. This includes credit card numbers, social security numbers, passwords, or similar types of information. Saffire will remove forms without notice which attempt to capture and store sensitive data.
Adding Form Items
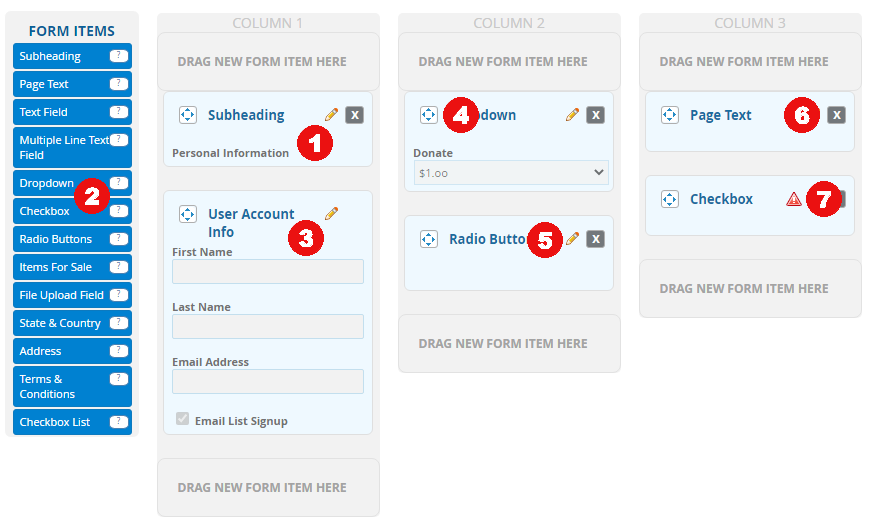
- Forms are built with items which represent data fields. These appear as light blue boxes across three columns. This layout keeps them compact for desktop computers, yet also mobile-friendly. When viewed on a mobile device the columns will automatically stack.
- Your form will have a few items already in place. These vary depending on the type of form you initially selected. They can be reordered and moved from column-to-column, and you can add data fields by dragging & dropping any of the dark blue Form Items from the left panel to any 'Drag new form item here' heading. See the Form Items article for details on how to use each of these.
- The User Account Info -which includes first name, last name & email address - is required on every form.
- Once added to the form, each item can be moved by grabbing the 4-way arrow next to the item name and dragging it to the position you choose.
- Click the pencil icon on each item to edit the headings and content.
- Any other data fields can be removed from the form by clicking the X in the top right corner of the item.
-
The warning icon identifies any item which does not have complete information. Click the pencil to add the necessary details.

Thank You Message
After each form submission a Thank You message will be displayed on-screen, and a Thank You email will be sent to the address submitted via the User Account Info form item.
You can customize both messages using the tools at the bottom of the form page.

Be sure to click Save before leaving your form!