
Dynaflex II Go User Guide
IN THIS ARTICLE
Payment Gateway Setup
Unboxing and Plugging In
Connecting via Bluetooth
Checking Battery Levels
Connecting via USB-C
Using with Laptops and Box Office
How to Complete a Transaction
Preventing Tamper Mode
Troubleshooting
RELATED ARTICLES
Dynaflex II Go Troubleshooting
Handheld Equipment Guides
Payment Processing

Payment Gateway
To use the Dynaflex II Go, your site will need to be integrated with the Magensa payment gateway. Magensa is compatible with Fiserv, TSYS and World Pay processors. If you're not familiar those processors we can put you in touch with a representative. For more details regarding Magensa, please contact your Saffire Website or Ticketing Account Manager.
Unboxing and Plugging In
- Unbox the Dynaflex II Go and ensure that all components are included:
- Dynaflex II Go device
- Short USB-C - USB-C cable (for connecting to mobile device)
- Long USB-A - USB-C cable (for charging)
- Plug the device in with one of the USB cables provided to ensure it has a full charge before your event. A tone should ring and light(s) should blink continuously at a constant rate.
- Navigate to SaffireTix settings on your mobile selling device and ensure that the "Magensa Only" setting is turned ON. This will allow the app to connect to the card reader.
- Connect the Dynaflex II Go with your mobile selling device via Bluetooth or USB-C cable. Information and instructions for both options are available below.
- For use with laptop kits, follow the instructions for setting up the Dynaflex PED card reader here.
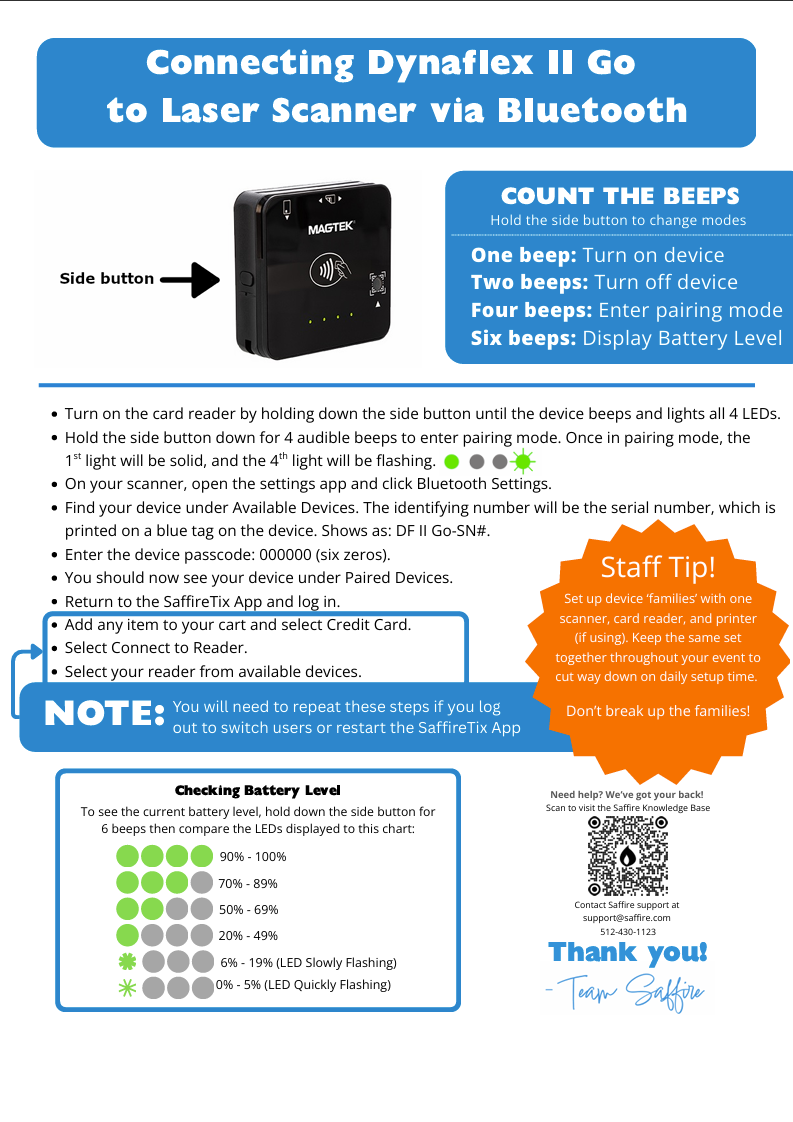
Connecting via Bluetooth
Connecting via Bluetooth provides a reliable connection for payment processing, but means the card reader will be running off of its own internal battery. Battery life on these card readers has been tested in the field up to 6 hours with no issues and may be good for much longer, however a battery backup or additional units to swap out may be a good precaution for long selling shifts in remote locations.
The Dynaflex II Go must be connected to the device via Bluetooth first before attempting to connect to Bluetooth in the SaffireTix app.
To connect via Bluetooth (Android devices):
- Turn on DynaFlex GO by holding the power button until 1 beep is heard.
- Connect DynaFlex GO to your device Bluetooth by first holding the power button again for 4 audible beeps, then connecting to it via device settings in the android device. Pin for DF-GO's Bluetooth is six zeros. (000000)
- Prepare a test transaction by adding a product to the app shopping cart.
- Click Credit Card payment option.
-
Select "Connect to Reader"

- Select the Bluetooth device with the serial number that matches the number on the back of the device. If you are not able to find the serial number, taking the device away from other card readers will narrow the options to only the device you have with you.
- When successful, the app should display Connected To: Dynaflex II Go.
-
It is always a good idea to run a test transaction to ensure the payment gateway is functioning before you attempt to use the device for customers.

Click here to download a printable version of this bluetooth pairing guide
Battery Management
Powering On
Power On DynaFlex II Go in Battery Operating Mode Press and hold the Power Button for two seconds: initially, LED 4 will light up, followed by all four LEDs illuminating for one second. This is followed by LEDs 1 and 2 remaining lit for 2 seconds, after which only LED 1 will be active.
Powering Off
To initiate the power-off sequence, press and hold the Power Button for two beeps then release. It's important to note that DynaFlex II Go cannot be powered off while connected via USB.
Checking Battery Life
Holding the power/action button for 6 audible beeps will display the battery level of the device. (Power button functions from the device manual included below).
The Dynaflex II Go device can have lights on yet still function improperly due to a low battery level right before it dies definitively.

Click here to download a printable power management guide
Connecting via USB-C
When connected to your mobile selling device via USB-C, the card reader will be powered by the selling device battery. Connecting via USB-C offers a generally reliable connection, however USB ports can at times be finnicky. It is always a good idea to ensure sellers know how to follow the Bluetooth instructions above in case of the need to switch to the device's internal battery.
To connect via USB-C:
- Using the included USB-C - USB-C cable, plug the device into a mobile scanner that is logged into the SaffireTix app. Solid or blinking green lights on the card reader indicate the device is connected.
How to Complete a Transaction
Handling to Prevent Tamper Mode
The DynaFlex II Go has built-in security features designed to protect your business. One of these is tamper mode. If the device detects signs of physical intrusion, damage, or abnormal conditions, it will immediately disable itself and erase its secure data. This ensures sensitive payment information cannot be accessed by anyone who might try to compromise the reader.
While this protects your business and customers, it also means the device cannot be recovered once tamper mode is triggered — it must be replaced through MagTek. Proper handling helps you avoid accidental tamper events and maximize device life.
- Avoid plugging/unplugging rapidly — let the device fully power down before reconnecting (about 10 seconds). This prevents power spikes that can trigger tamper mode.
- Keep the reader in normal operating temperatures. The device is certified for operation in temperatures 32°F to 95°F.
- Prevent exposure to rain, spills, or any liquids. Even small amounts of moisture can trigger tamper mode.
- Use padded cases or the original packaging when storing or transporting the device.
- Do not leave the reader in vehicles or environments with temperature/humidity extremes.
- Plug and unplug USB-C cables straight in and out — avoid wiggling or pulling at an angle.
- Protect against drops, crushing, or strong impacts.
⚠️ Important: If a DynaFlex II Go enters tamper mode, there is no way to reset it in the field. It must be replaced through MagTek. Careful handling and proper storage are the best ways to ensure long service life.
Using with Laptops and Box Office
The Dynaflex II Go can also be used with laptop kits for box office transactions. To set up this card reader for use with a laptop, follow the instructions for setting up the Dynaflex PED card reader here.
Selecting a Card Reader in Chrome (Box Office
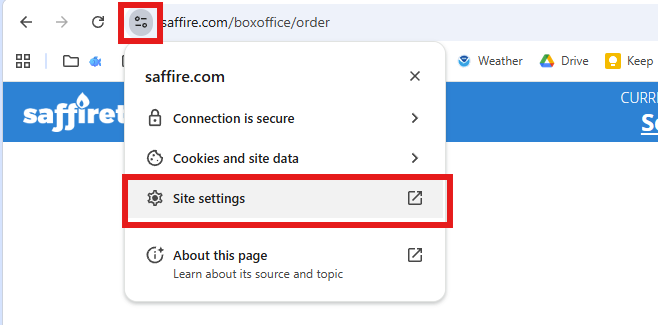
When you launch your website in Kiosk or Box Office mode, you should see a pop-up that asks you to Allow the website to "Look for and connect to any device on your local network". Please click Allow.

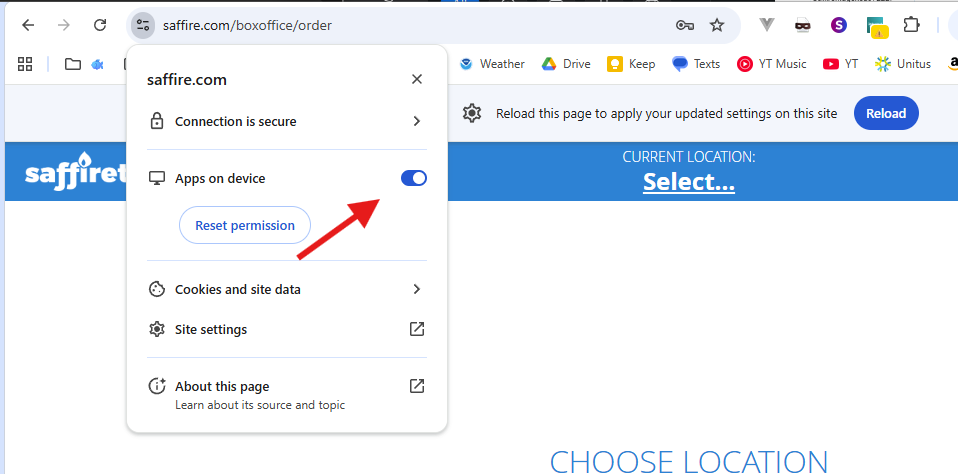
If you accidentally click Block, you can reset this by opening the 'Site Information' button to the left of the website URL bar and turning the Apps on Device toggle to On

Device Not Showing in Dropdown
If the device is not showing in the dropdown option for either the kiosk or the box office, please check that the Google Chrome settings are allowing the device to connect with your local network. Here are the steps on how to confirm these settings:
Please Read: If the PED is being used on a personal device, please make sure Windows is logged into an account that has administrative access to implement the setting changes to the device permanently.
Note: If you are in kiosk mode, you will need to exit kiosk mode and open a new Chrome browser to find the settings options to verify.
-
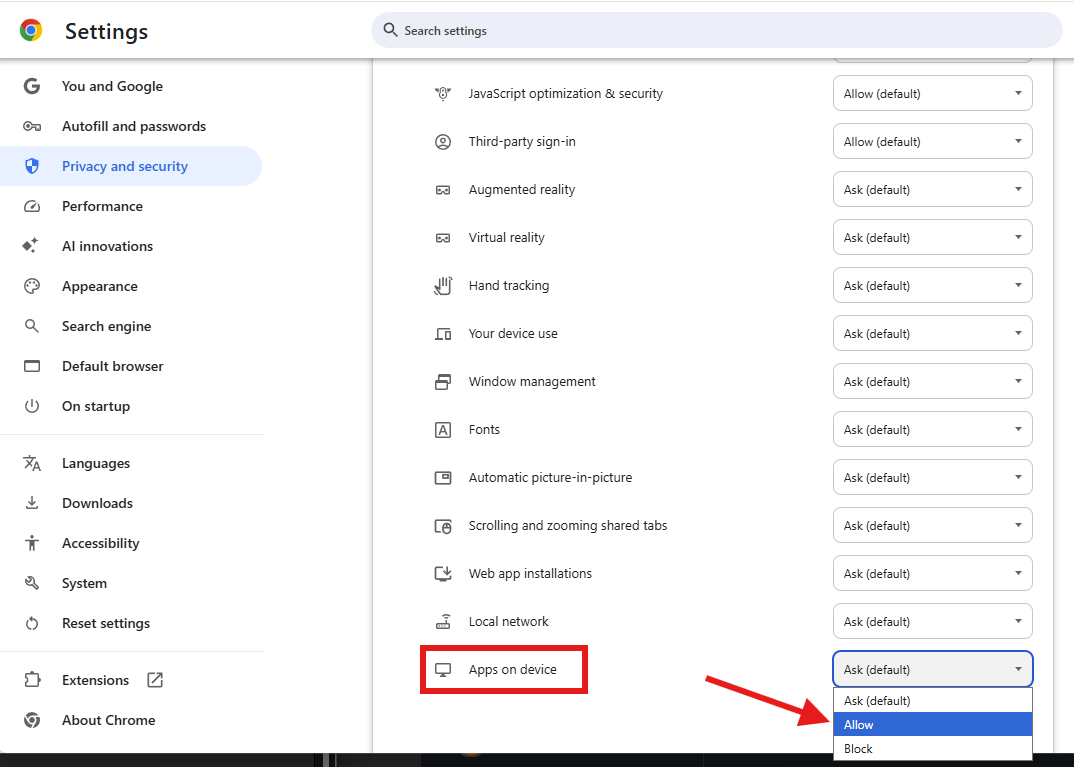
Select the 'Site Information' button to the left of the website URL bar and select Site Settings.
-
Scroll to the very bottom and change the Apps on Device dropdown to Allow.
-
Return to the tab with your website and open the Site Information button again. There should now be a toggle for Apps on Device set to Allow.
- Refresh your browser and attempt to find your card reader again. You should now see it available in the dropdown. If it is still not present, close and reopen your browser to ensure the new settings are applied.


If the device is still not showing in the drop-down, please check if powder is installed in the device, or it may need to be installed/reinstalled. Here is the link to the Dynaflex driver installation article: Dynaflex Powder Installation
Troubleshooting
"No card reader connected, connect shuttle card reader"
This indicates that Magensa has not been enabled in the app settings. To enable, open the settings by tapping the gear at the bottom of the screen. Turn on the setting for "Magensa selling only", then continue with connection instructions above.
Device beeps, blinks, then shuts down
Device has entered 'tamper mode' and will need to be replaced. Contact your ticketing account manager or get in touch with Saffire support through the orange Help box at the bottom right of your screen.
What do the beeps mean when I hold the power button?
The device will beep when you hold down the power button. Holding down the power button for 2 beeps will power off the device. Holding for 4 beeps will allow Bluetooth pairing. Holding for 6 beeps will display the battery level.

Tap-to-pay unresponsive or giving error "Sorry we couldn't complete the contactless read, please try the chip reader or mag-strip". This could also cause a white screen to display on the scanning device.
This indicates that Near-field-communications (NFC) is active on the device and will need to be turned off to allow tap-to-pay. This prevents interference between the scanner and card reader. To disable NFC, follow the instructions below.
Disabling NFC
To disable Near Field Communications (NFC), you will first need to exit the Hexnode program running on the device.
1) You will want to navigate to the home screen if this isn't your starting interface. This can be done by swiping up from the bottom of the screen and tapping the circle Home Button at the center of the bottom of the screen.
2) Tap on the home screen 5 times in quick succession.
3) Type in the current Hexnode password given to you by your Ticketing Account Manager. The default password is "T1xxxxxxxxxx" (T1 and10 x's) and hit "Exit".
4) Navigate to the Settings app
5) Search for NFC
6) Tap either option in the search results and select "NFC"
7) Navigate to the Home screen
8) Swipe up to navigate to the Apps screen
9) Select the green Hexnode app
10) Tap the "Activate" verbiage under Kiosk mode!