
Microcom 485TC Printer User Guide
IN THIS ARTICLE
Unboxing and Plugging In
Connecting to a Computer
Loading Ticket Stock
Cleaning Print Heads
General Maintenance
Microcom 485T
RELATED ARTICLES
Microcom 485TC Driver Installation
Microcom 485TC Troubleshooting
The Microcom 485TC printer is a thermal printer designed for printing tickets, labels, and tags. This guide will walk you through the basic setup and maintenance for daily use.

Unboxing and Plugging In
- Unbox your Microcom 485TC printer, and ensure that all components are included:
- Printer unit
- Power cable
- USB-A - USB-B cable
- Ticket catch tray
- Position the printer on a stable, flat surface near your computer.
- Plug the power cable into the back of the printer and connect it to a power outlet.
- Use the power switch on the back of the printer to turn it on. The screen on the front of the printer will illuminate, indicating the printer is powering on.
Connecting to a Computer
The Microcom 485TC printer is connected to your computer via a USB cable, included in the printer kit box.
-
Attach the USB cable to the corresponding port on the back of the printer:
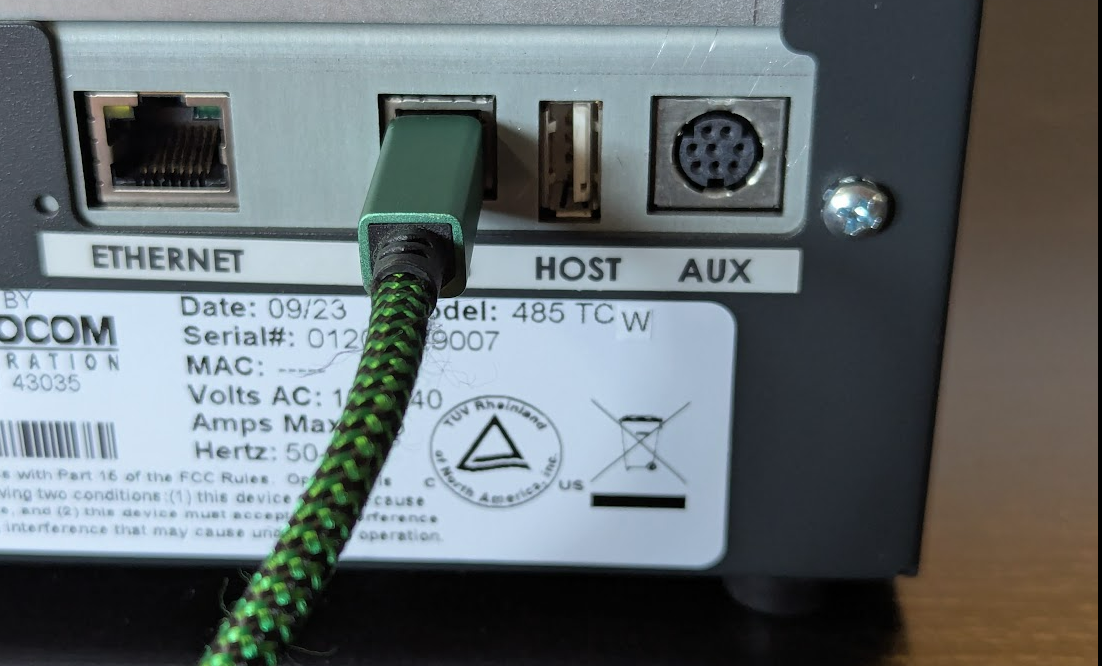
- Connect the other end of the USB cable to your computer in the port marked Printer.
- SaffireTix computers are shipped to you with all proper drivers pre-installed.
- If you're connecting a printer to your own computer, then you will need follow our Microcom 485TC Printer Installation Guide.

Loading Ticket Stock
Properly loading ticket stock ensures your printer runs smoothly without jams.
-
Feed the stock through the back between the green adjustable ticket guides so that the perforated stub is the first thing to be printed on. The left edge of the ticket will be the last thing to go through the printer.

- Once the printer detects media, it will auto-feed and align. Confirm the printer touchscreen shows STATUS: READY


Looking for information about ticket stock? Visit our Ticket Stock Guide.
Cleaning the Print Heads and Sensor
Regular cleaning of the print heads and sensor is important for maintaining high-quality prints.
- Power off the printer and unplug it from the power source.
-
Open the top panel by unscrewing the thumb screws at the back. Lift the lid and tilt the whole face forward to access the print head.

-
Pinch the two black tabs together to open the print head access port.

-
Using a lint-free cloth or cotton swab dipped in isopropyl alcohol, gently clean the print head. Be sure to remove any buildup or debris from the thermal elements.

- Allow the print head to air dry for a few minutes.
-
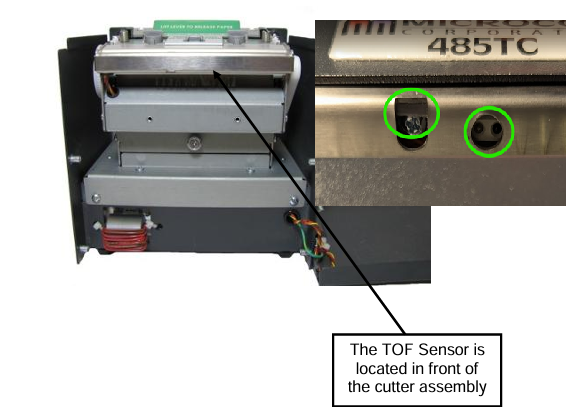
Using a cotton swab dipped in alcohol, gently clean the sensors, found at the front of the printer.
- Closing the printer head access port by pressing firmly on the two green dots indicated on the device.
- Power the printer back on and run a test print.


General Maintenance
Paper Path Inspection: Regularly check the paper path for debris or leftover ticket fragments that could cause jams. Remove any obstructions as needed.
Printer Calibration: If your prints are misaligned or skipping, recalibrate the printer by holding down the Feed button while powering on the device. This will reset the paper alignment sensors.
Microcom 485T
The Microcom 485T is the same basic printer as the 485TC, but in an enclosure designed to hold ticket stock inside, rather than outside, the printer. The same setup and troubleshooting apply to the 485T, with the exception of one step during driver installation. If you are using a 485T, be sure to select the proper printer (485T W (300dpi) cutter) during the driver installation process. as this may affect the print settings.
