
Event Import Tool
IN THIS ARTICLE
Download the Template
Essentials
Do a Test Upload
Add a Quick Event
Event Templates
Add an Event w/Detail Page
Add an Event w/Detail & Multiple Items
RELATED ARTICLE
Spark includes functionality for uploading events in bulk via a custom spreadsheet. You can upload Quick Events, Events with Detail Pages, and Events with Multiple Occurrences (each having unique dates, times & locations).
The importer can save you a lot of time... yet there are several guidelines you have to follow to ensure the data gets mapped to your event listings correctly.
First, please read through this entire article before before attempting to use this tool. Know that it's very detail specific with rules which have to be followed,
Second, please download a fresh copy of the Template. It gets updated from time-to-time.
Third, we strongly urge you to do at least one test import before trying to upload dozens of events and potentially experiencing import errors. The following details can help you achieve success on your first attempt!
Download the Import Template
Spark location: Events
To get started, select the Import link on the Events Dashboard...

Then, download the template (spreadsheet). We recommend downloading a fresh copy each time you use the importer to ensure you're getting the most up-to-date version. Older spreadsheets will fail to import.

Essentials
-
There are two tabs at the bottom of the spreadsheet - Events, and Items. When you open the sheet it will default to the Items tab.

- The Items tab is used when loading instances of an event with multiple dates, times and/or locations, such as when a magician performs on various stages at various times on various days. If you have only a single instance of an event, you can switch to the Event tab and ignore the Items.

The spreadsheet columns cannot be modified - not by renaming them, nor moving them, deleting them or adding to them. Any of these modifications will cause the upload to fail.
- Required fields appear in boldface among the many column headers... refer to the specific requirements shown below each type of event detailed on this page.
- You can create unlimited Quick Events with the same name. But...
- For events with full detail pages, the event name cannot be duplicated... yet you can make multiple uploads to an existing event to add more items!
- The importer will not overwrite existing events or update existing items. If you need to make changes to an existing entry, it will need to be edited from the Events Dashboard.
- If a category name is misspelled, a new category will be created based on the typo. The same rule applies to sub-categories. These can be corrected fairly quickly by using the bulk actions on the Events dashboard to move events to the correct category or sub-category - but it's easier to avoid this step from the get-go.
- If you're using a Category with sub-categories activated, the appropriate sub-category must also be added to the spreadsheet
- If sub-categories are not already active in a category, they cannot be added through the importer.
- If 'Type of Event' (column H) is not specified as 'Full Page Event' it defaults to 'Quick' - this is for Quick Events which do not link to event detail pages.
- If no end date is included with an event, the calendar interprets it as a single-day event.
- If 'Location mode' (column U) is not specified, it will default to 'Event'
Do a Test Upload
- Once you've determined the type of events you want to import (those are explained below), yet BEFORE entering massive amounts of data into the spreadsheet, add just five made-up events and a few associated items (instances) to the sheet and do a Test Upload. This will ensure your data is matching up with the event database correctly. Later on you can deactivate & delete these test events.
- Once you know that the importer is happy with your data, add your events & items into sheets with no more than 250 rows, making sure related events & items are in the same upload. This should avoid the possibility of browser timeouts during lengthy data transfers.
- If errors occur, the importer will automatically download an Error file to your computer. This file will show you the name, line number and the reason for the error. Click here for examples of event import errors.
Add a Quick Event
Quick Events work great when your event information is limited to a date, time, location, brief description, a single image, and a single link (which is usually external). From the Event Calendar, they don't click-thru to a detail page, and they stand alone as unique events.
Once imported, Quick Events appear on the Event Dashboard with a lightning bolt icon:

To import Quick Events, switch to the Events tab at the bottom of the sheet. Quick events do not utilize the Items tab.
Required fields for Quick Events:
- Name - (of the event)
- Primary category
- Year - (must be four digits, e.g. 2025)
- Start Date - (m/d/yyyy)
Event Templates
There's another template you need to consider when importing events with detail pages.
This does not apply to Quick Events.
The Event Templates are accessible in Spark from Events > Event Templates, and your site already has at least one. Each event you import with a detail page will use the default template unless you specify a different template in Column T of the spreadsheet.
Check your default template NOW to ensure it's displaying everything you want to import. Make sure any important modules are not hidden or missing. If you're adding links, you'll need to add a Links module to the template. Same for Custom Fields.
Your event template gives you the power to customize the layout of your detail pages. Keep in mind that templates are used as starting points for new pages - they can't be retroactively applied to existing pages. So it's vital to get it right the first time!
Add an Event with Detail Page
This is an Event which clicks-thru to a detail page, yet is just a one-time occurrence. A good example is a grandstand event, such as a concert. As your headline event, you may have an extended description, multiple photos, clear bag policy, parking information, extra links (and more) that you want to add to that page.
To import one-time events with a detail page, switch to the Events tab at the bottom of the sheet. You won't need to use the Items tab, but you will need to include some extra details:
Required fields for Events with Detail Pages:
- Name - (of the event)
- Primary Category - If a category name is misspelled, a new category will automatically be created based on the typo. This can be corrected fairly quickly by using the bulk actions on the Events dashboard, but it's easier to avoid this step from the get-go.
- Note: If you're using a category with sub-categories activated, the appropriate sub-category must also be added to the spreadsheet.
- Year - (must be four digits, e.g. 2025)
- Start Date - (m/d/yyyy)
- Type of Event - column H must be Full Page Event (contrary to what it shows on the spreadsheet!). If this is not specified, it defaults to a Quick Event and does not create a detail page.
- Location mode - leave column U blank and it will default to Event Mode... exactly what you want!
Oops:
-
If you accidentally import something as a Quick Event, you can convert it to a Full Page Event in the Events Dashboard. Mouse over the event name and select 'Add Detail Page':
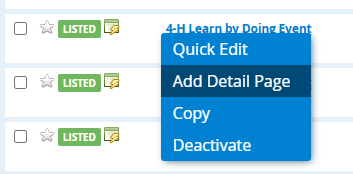
After converting it to a Full Page Event you'll need to do another import to pull in the Items. You'll need to change column H to Full Page Event corrected)

Add an Event with Detail Page & Multiple Items
This type of event includes a detail page showing every instance of the event - each date, time & location. A good example is a juggler at the fair who performs on multiple days, at different times, on different stages. They might have 25 different performances, yet they'll all link back to the same detail page.
A bonus for you is that it reduces the number of rows on your event dashboard. The event will appear just once in the dashboard rather than as 25 different items - yet each instance (performance) will still appear on your public-facing event calendar. Nothing to lose - much to gain!
For events with multiple dates, times and/or locations, you'll use BOTH tabs at the bottom of the sheet.
Required fields - pay close attention to these settings!
- Events tab:
- Name
- Primary Category - If a category name is misspelled, a new category will automatically be created based on the typo. This can be corrected fairly quickly by using the bulk actions on the Events dashboard, but it's easier to avoid this step from the get-go.
- Type of Event - column H must be Full Page Event (contrary to what it shows on the spreadsheet!). If this is not specified, it defaults to a Quick Event and does not create a detail page.
- Year - (must be four digits, e.g. 2025)
- Start Date - (m/d/yyyy)
- Location Mode - set column U to Item
- Items tab:
- Event name - this MUST match the name on the Events tab - exact spelling is crucial
- Year - this MUST match the year entered on the Events tab
- Location - locations must pre-exist in Spark... it will not auto-create new locations
- Start Date
Oops:
-
If you accidentally import something as a Quick Event, you can convert it to a Full Page Event in the Events Dashboard. Mouse over the event name and select 'Add Detail Page':
After converting it to a Full Page Event you'll need to do another import to pull in the Items. Set column H to Full Page Event, and set column U to Item.
- Descriptions are usually added with the Items, which allows you to provide unique descriptions for each instance. Adding Descriptions to the Events will place a single description on the detail page - and there's nothing wrong with that! But you'll want to check your event template in advance to see where the description will appear on your detail pages.