
Reports - Failed Scan
IN THIS ARTICLE
Failed Scan Report Overview
Understanding Failure Reasons
Converting Holds into Invoices
View Invoices in Spark
Troubleshooting Failed Scans
Code Not Found
RELATED ARTICLES
Code Lookup Tool
Reports: Redemptions
Redemption Setup - General Admission
Redemption Setup - Reserved
The failed scan report allows you to view, print, export, or email any failed redemption made through the SaffireTix app.
This report will show the location and date the ticket was scanned. It will also show the reason for the failed redemption. If you hover over the ticket code, you will see a more detailed reason as to why the QR code failed to scan. For more information about the order, click the Order ID number associated with a code to see the order receipt. To adjust the redemption rules for a product, click the product name associated with the code to visit that products setup page.
If you have a specific code you need to view redemptions for, check out the Code Lookup article.
Why a failed scan might be a good thing
While on the surface the word "failed" seems like it indicates a problem, failed scans are often an indication that the system is working exactly the way it should. Some of the reasons a failed scan might be correct include:
- Patrons arriving on the wrong event date
- Previously redeemed tickets being passed to non-ticket-holders
- Tickets that have been photocopied and shared
- Attempts to access VIP areas with standard tickets
Looking at the failed scan report will help you determine whether a scan failed when it should have failed, or failed when it should have succeeded.
Location: Commerce > Reports > Failed Scan
Failed Scan Report Overview
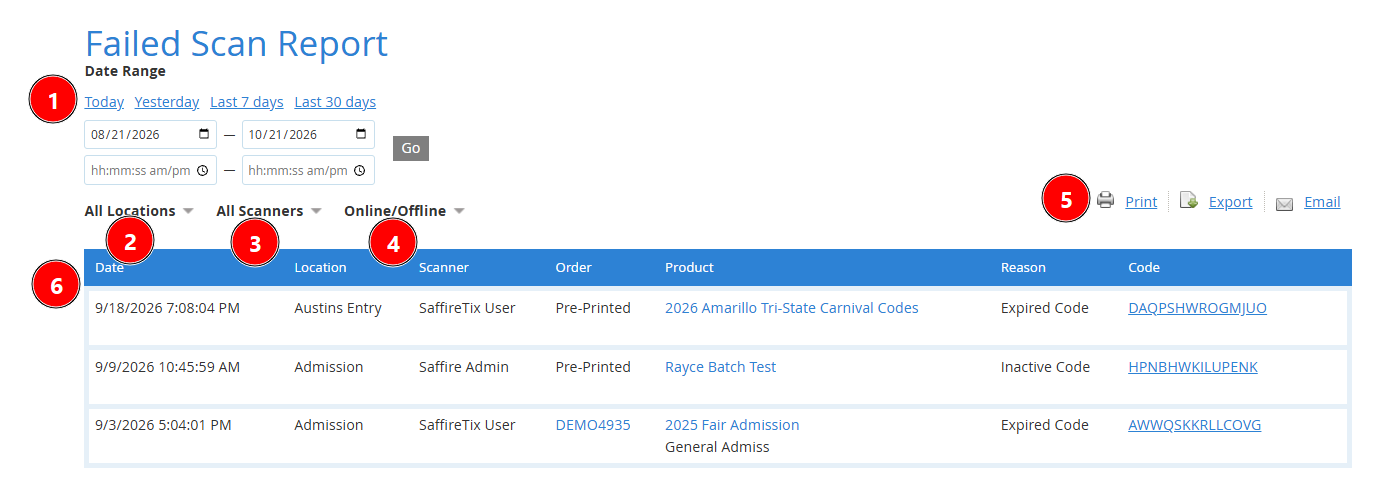
- Date range for report
- Location selector
- User selector
- Online/offline mode selector (While all scans made when in offline mode will show as successful in the moment, this report will identify scans that were allowed during offline mode that would have failed in online mode. For further details, see our Offline Mode article.
- Sharing options
- Report fields
- Date
- Location
- Scanner (the user who scanned the redemption attempt)
- Order ID
- Product Name
- Scan failure reason
- Ticket code (hover for failure reason details)
SaffireTix App Scan Failure Screen
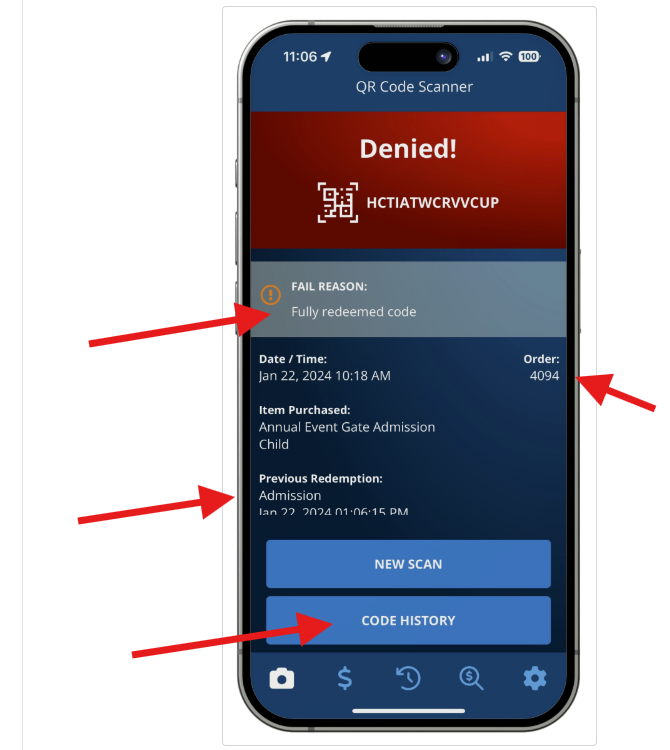
When a code fails in the field, a lot of this information is available right on the screen of the SaffireTix app. You will be able to see the failure reason, previous redemptions made, the order number, the scan history of the code and more. You can see more info about the denied scan screen in our SaffireTix App User Guide.
Understanding Failure Reasons
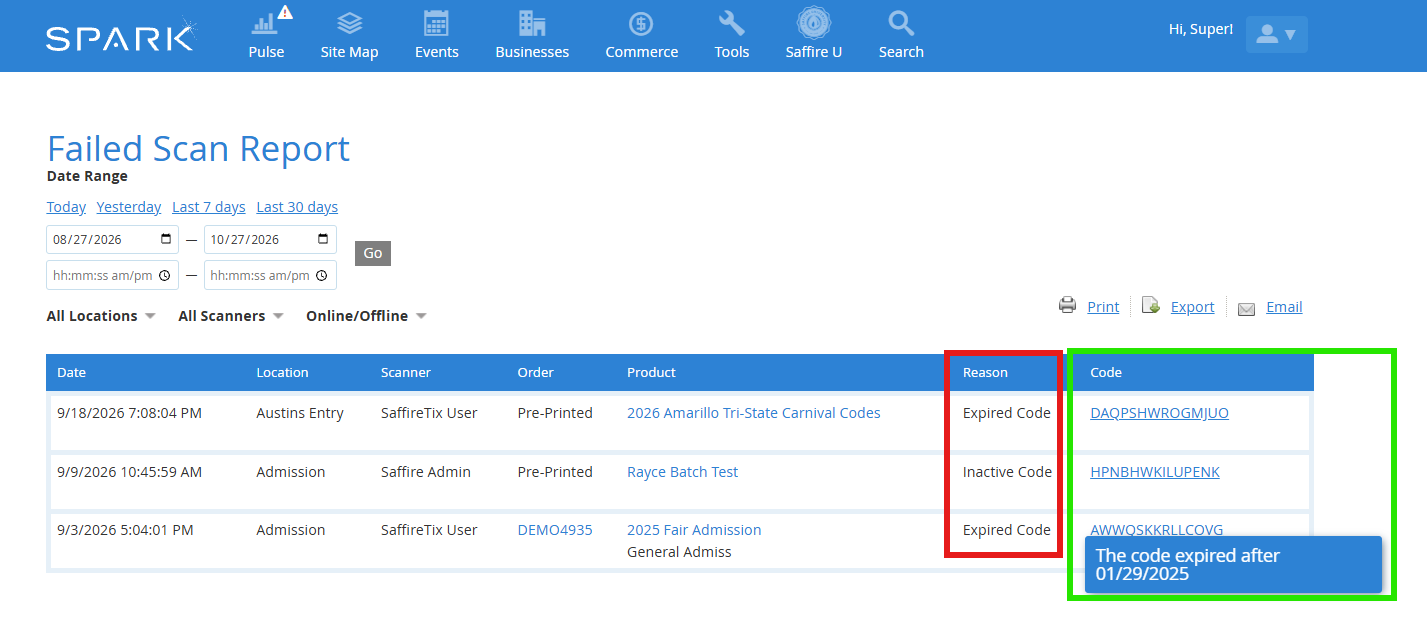
You'll find information about the failure in two places. The Reason column (highlighted in red below) shows you the basic category of the failure. Hovering over the code itself (highlighted in green below) shows you further details of the failure. See below for an explanation of the various failure categories that appear in the Reason column.
Fully redeemed code/Fully redeemed code today - Indicates that the code has limited scans, all of which have been completed. If the error includes the word "today", this indicates that the code is scannable a limited number of times on multiple days and it has met it's redemption limit for today only. Hovering over the code for details will show you how many scans the code is configured to allow.
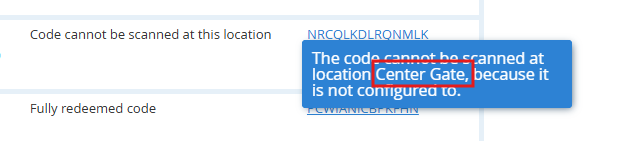
Code cannot be scanned at this location - Indicates that the code is configured to not be scannable at this location. Hovering over the code will show you the scan location for the failure.
Expired code - Indicates that the valid redemption dates for this code have passed. Hovering over the code will show you what date the code expired on.
Not redeemable until code start date - Indicates that the valid redemption dates for this code have passed. Hovering over the code will show you what date the code expired on.
Inactive code - Indicates that the code has been deactivated in Spark. This can be due to a cancelled order or a deactivated product.
Day pass has been used on a previous day - Indicates that the code is set up for unlimited scans within a date restriction. If the date has passed, you will see this message.
Troubleshooting Failed Scans
Cannot be scanned at this location when the location is correct
In addition to checking the product to be sure the location you are at is set to scannable, check to make sure that the scanner is logged into the correct location. Even if you are physically at the location Gate 2, if your scanner is mistakenly logged into Gate 1, your scan may fail. Hovering over the code by the failure message will show you which location your scanner was logged into when they made the scan attempt.
All tickets result in a failed scan
If your even has just begun and you cannot get any successful scans, it's likely there is an issue with your redemption rules or locations.
- Expired code - If you see the reason Expired Code, it's likely that your products were copied from a previous year and the redemption dates were not updated to reflect the current year. To update the redemption dates, click on the product name to open the product editor in a new tab. Navigate to the Redemption tab, and update the redeemable dates.

-
Code cannot be scanned at this Location - If you see the reason Code cannot be scanned at this location your product may have incorrect/no scannable locations added. To update the redemption dates, click on the product name to open the product editor in a new tab. Navigate to the Redemption tab, and update the redeemable locations.
If the location is already correct or you are still experiencing failures, check to see if your scanner is logged into the correct location and that the location is active. For further location troubleshooting visit our App User Guide.
Accidental Double Scans
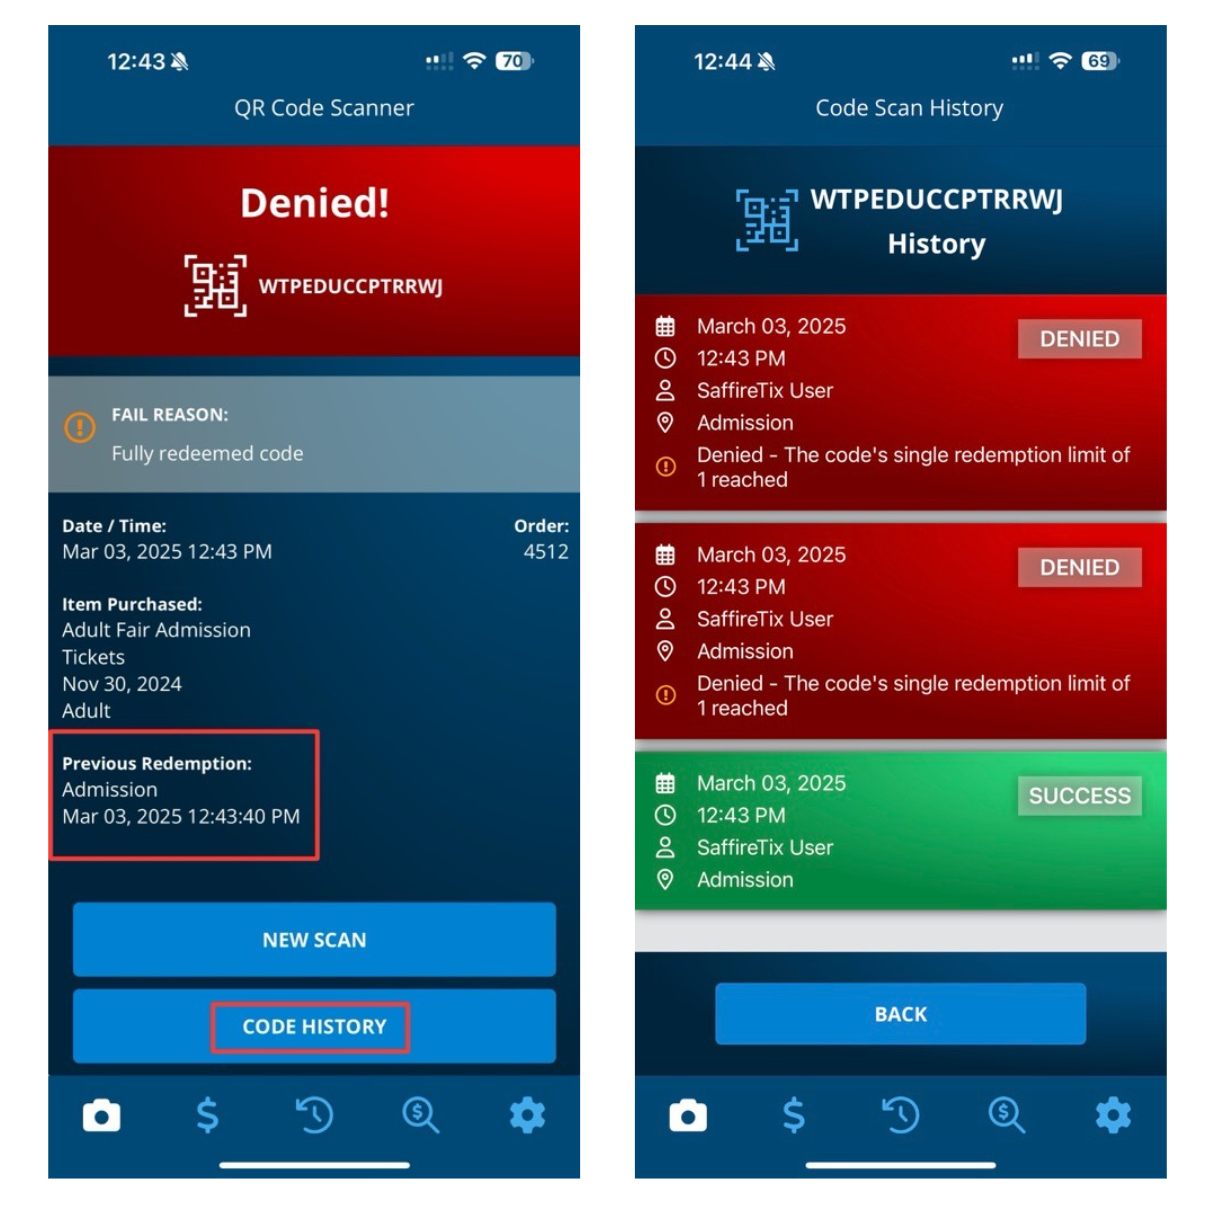
Double scanning can easily happen by mistake. If a ticket is being denied and you don't think it should be, check the "Previous Redemption" information on the Denied screen. If the previous redemption was at the same date and time, it was likely scanned just seconds prior, and the Success message was missed!
You can also click the "Code History" button at the bottom of the screen to view the previous redemptions. This will result in the original Success scan displaying at the bottom of the list, and the most recent scan at the top of the list. If the date and time are the same, this is an indication that the scanner missed the original Success screen, and then tried re-scanning the ticket over and over.
Code Not Found
Code not found is a special case of failure reason, and it will not show up on this report but may be the failure reason shown on the SaffireTix App denied scan screen. If you see a code not found error, it indicates that the code does not exist anywhere in your Spark. There are a few reasons this can happen.
Scanning a code too soon after it's created in Spark - In most cases, codes are created at the time of ticket purchase. If you are selling tickets at one location, then scanning them at a gate nearby, it's possible that the codes just created at purchase time are not yet ready to scan when patrons arrive at the scanning location. This is more likely to occur with in poor network conditions. It may be necessary to wait a minute or two between selling and scanning or move the locations a bit farther from each other to prevent the code not found error.
Code Bank - If you are scanning carnival codes that were uploaded as a code bank in Spark, it is possible that the code bank was not attached to the product prior to onsale. In this case, the system would create new codes for each transaction instead of selling them out of a code bank. In these cases, it's usually possible to export the created codes and provide them to your midway/carnival partner for upload into their system. Reach out to Saffire support for further assistance.
Logged into the wrong site - If you have multiple ticketing portals with Saffire, it's possible that the tickets you are trying to scan were sold on the other portal from the one you are logged into. For example, many clients keep one site for fairgrounds sales (www.ourfairgrounds.com) and another for Fair sales (www.ourfair.com). Check the scanner to make sure you are logged into the correct URL. In most cases you can compare against the name of the site on the printed ticket.