
Commerce Settings
IN THIS ARTICLE
Sales Tax
Transaction Fees
Product Fees
All-In Pricing
Non-SaffireTix Delivery Methods
SaffireTix Delivery Methods
Purchse Policy
Delivery Cart Add-Ons
What Saffire Manages For You
Commerce Settings include key components which apply to products you create - both ticketed and non-ticketed - and to your customer shopping cart.
If you don't have eCommerce enabled on your site, you won't have access to this section. Contact support@saffire.com if you're interested in selling online!
Spark location: Commerce > Commerce Settings
Sales Tax
The percentage added to this field will apply to all products with Sales Tax enabled which are added to the shopping cart. Sales Tax must be enabled per product under Advanced Options. If you do not need to add Sales Tax, enter 0 in this field.
Transaction Fees
Transaction Fees are applied one time at checkout. They are commonly used for credit card processing fees predetermined by your payment gateway. When the transaction fee is set as a percent, the percent is calculated on the product total before fees. When the transaction fee is set as a dollar amount, the amount is calculated on the product total including fees.
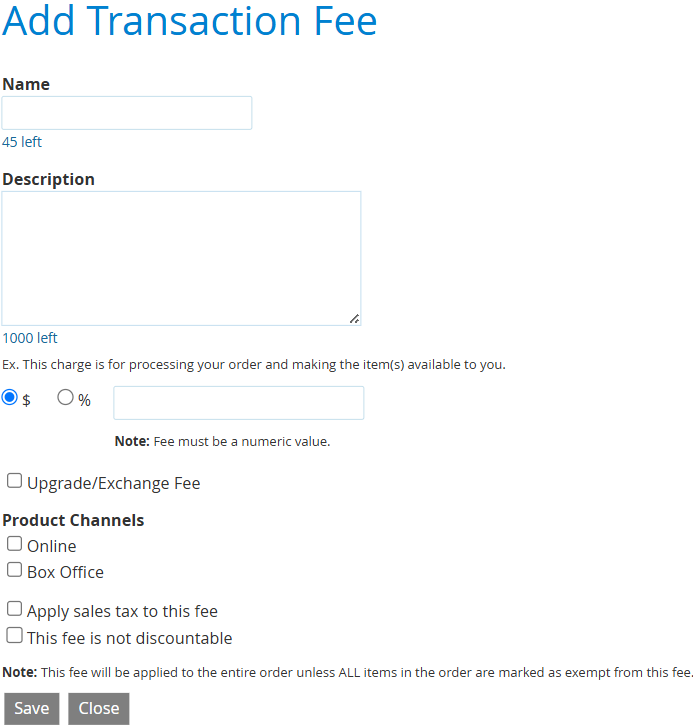
You can create a new Transaction Fee by clicking Add Transaction Fee and inputting the following:
- Name of the fee
- Add a description or explanation of the fee. We require descriptions so you can give your customers a brief explanation of why they're receiving this fee. Example: This charge is for processing your order and making the item(s) available to you.
- Choose to apply a dollar ($) amount fee or a percentage (%) amount fee. We suggest you make the decision based on the average price of the products/tickets on your site.
- Determine whether the fee should be applied to Online sales or Box Office sales - or both!
- Choose whether to Apply sales tax to this fee
- You also can choose whether to keep the fee from being discountable.
- Click SAVE
Like all Spark features, to modify an existing Transaction or Product fee, hover over the fee name and select Edit. You can also Copy to use an existing fee as a template when creating new fees, or Deactivate to disable the use and application of the fee. If you create products that are exempt from taxes and/or fees, you can specify that on the product itself under Advanced Options.
Product Fees
Product Fees are also enabled on a product level and apply to each applicable product in the cart. They are commonly used for Convenience or Facility fees. Unlike Transaction fees, this fee type can be created in either your Commerce Settings or while building the product itself. If created during Product build, you will need to navigate to Commerce Settings to modify.
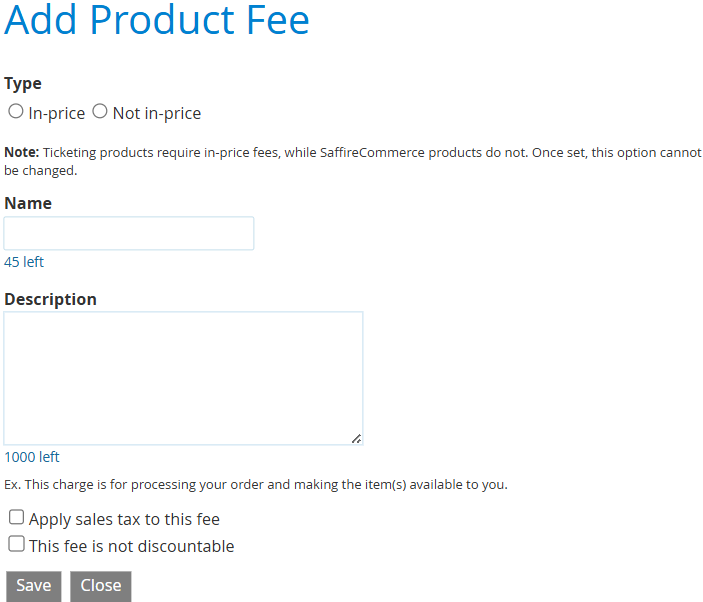
You can create a new Product Fee by clicking Add Product Fee and inputting the following:
- Choose if you would like to Include in Price. This increases the total product cost by the fee amount rather than showing the fee as a separate line item during checkout. The fee will be broken out in your Sales Report. See the All-In-Pricing section below for important details!
- Name of the fee
- Add a description or explanation of the fee
- Choose whether to Apply sales tax to this fee
- Choose whether the fee is discountable or not.
- Click SAVE
Below the list of Product Fees on the Commerce Settings page you'll also find a checkbox which allows you to Consolidate Fees into a single line-item in the shopping cart. Once checked, you'll have Name and Description fields which you can modify if you wish.

Fee amounts are set on individual products, and can be set as a dollar amount or a percentage.
All-In Pricing (FTC Compliance)
The FTC announced a new Junk Fees Rule which took effect May 12, 2025. From that date forward, businesses must clearly disclose the true total price inclusive of all mandatory fees whenever they offer, display, or advertise any price of live-event tickets.
New FTC Rule (May 12, 2025): All live-event tickets must show the full, final price upfront, including all required fees. Learn more →
To comply:
-
When creating a new Product Fee, check Include in Price
This cannot be edited later – only at creation.
- This ensures the full price appears on the product, while the fee can still be broken out in reports.
At Saffire, we now recommend:
- Embedding all fees into each product
This will incorporate your fee into the price that the customer sees as they shop and will still allow you to separate out the fees in your Spark reporting. Many states have adopted similar legislation, so we recommend you check with your legal counsel to ensure you are adhering to all local, state, and federal requirements.
To help customers understand this change, a pop-up message about all-in pricing will display at checkout by default. If you'd prefer to remove this pop-up, please contact Saffire Support for assistance.
For further information on all-in pricing, visit the FTC.gov Junk Fees Rule FAQ.
Non-SaffireTix Delivery Methods
This allows you to create multiple fulfillment methods for various price ranges of non-ticketed products.
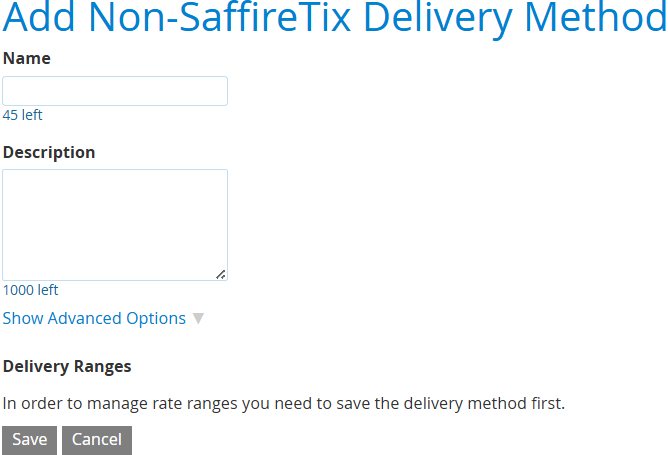
- Name your Delivery Method Examples include, Ground, 5-7 Business Days, Overnight, etc.
- Description is also required. This is a good place to explain your delivery and shipping options. For instance, Orders will be processed and shipped within 3 business days. Ground shipping usually delivers within 5 business days of the shipment date.
Click SAVE to review Advanced Options and to add Delivery Ranges and Pricing

- Begin by adding a LOW PRICE - 0.00 ($0) is what you should begin with.
- Add the HIGH PRICE - highest priced item you are able to ship with this shipping method.
- Add the DELIVERY PRICE for that price range. You can create multiple price ranges and set the cost of the Delivery Price for each range (shown above).
- Click SAVE
SaffireTix Delivery Methods
Few scenarios would require a delivery method for SaffireTix (e.g. Print at Home or Will Call). These function exactly the same as shown above, but apply strictly to SaffireTix products.
Purchase Policy
Location: Commerce > Commerce Settings
Following this guide will allow you to require your customers to accept a purchase policy prior to making an online purchase.
The acceptance of this policy is recorded and available in the Purchases Report Export so that the customer's acknowledgement can be used in any Chargeback Disputes as compelling evidence to challenge Friendly Fraud reason codes.
We have provided some default language, but we STRONGLY ENCOURAGE you to add custom sections that are relevant to your organization. Things that would be great to add to this policy would include how your organization handles:
- Refunds
- Exchanges
- Transfers
- Chargebacks
- Disputes
- Venue Rules/Restrictions
- etc.
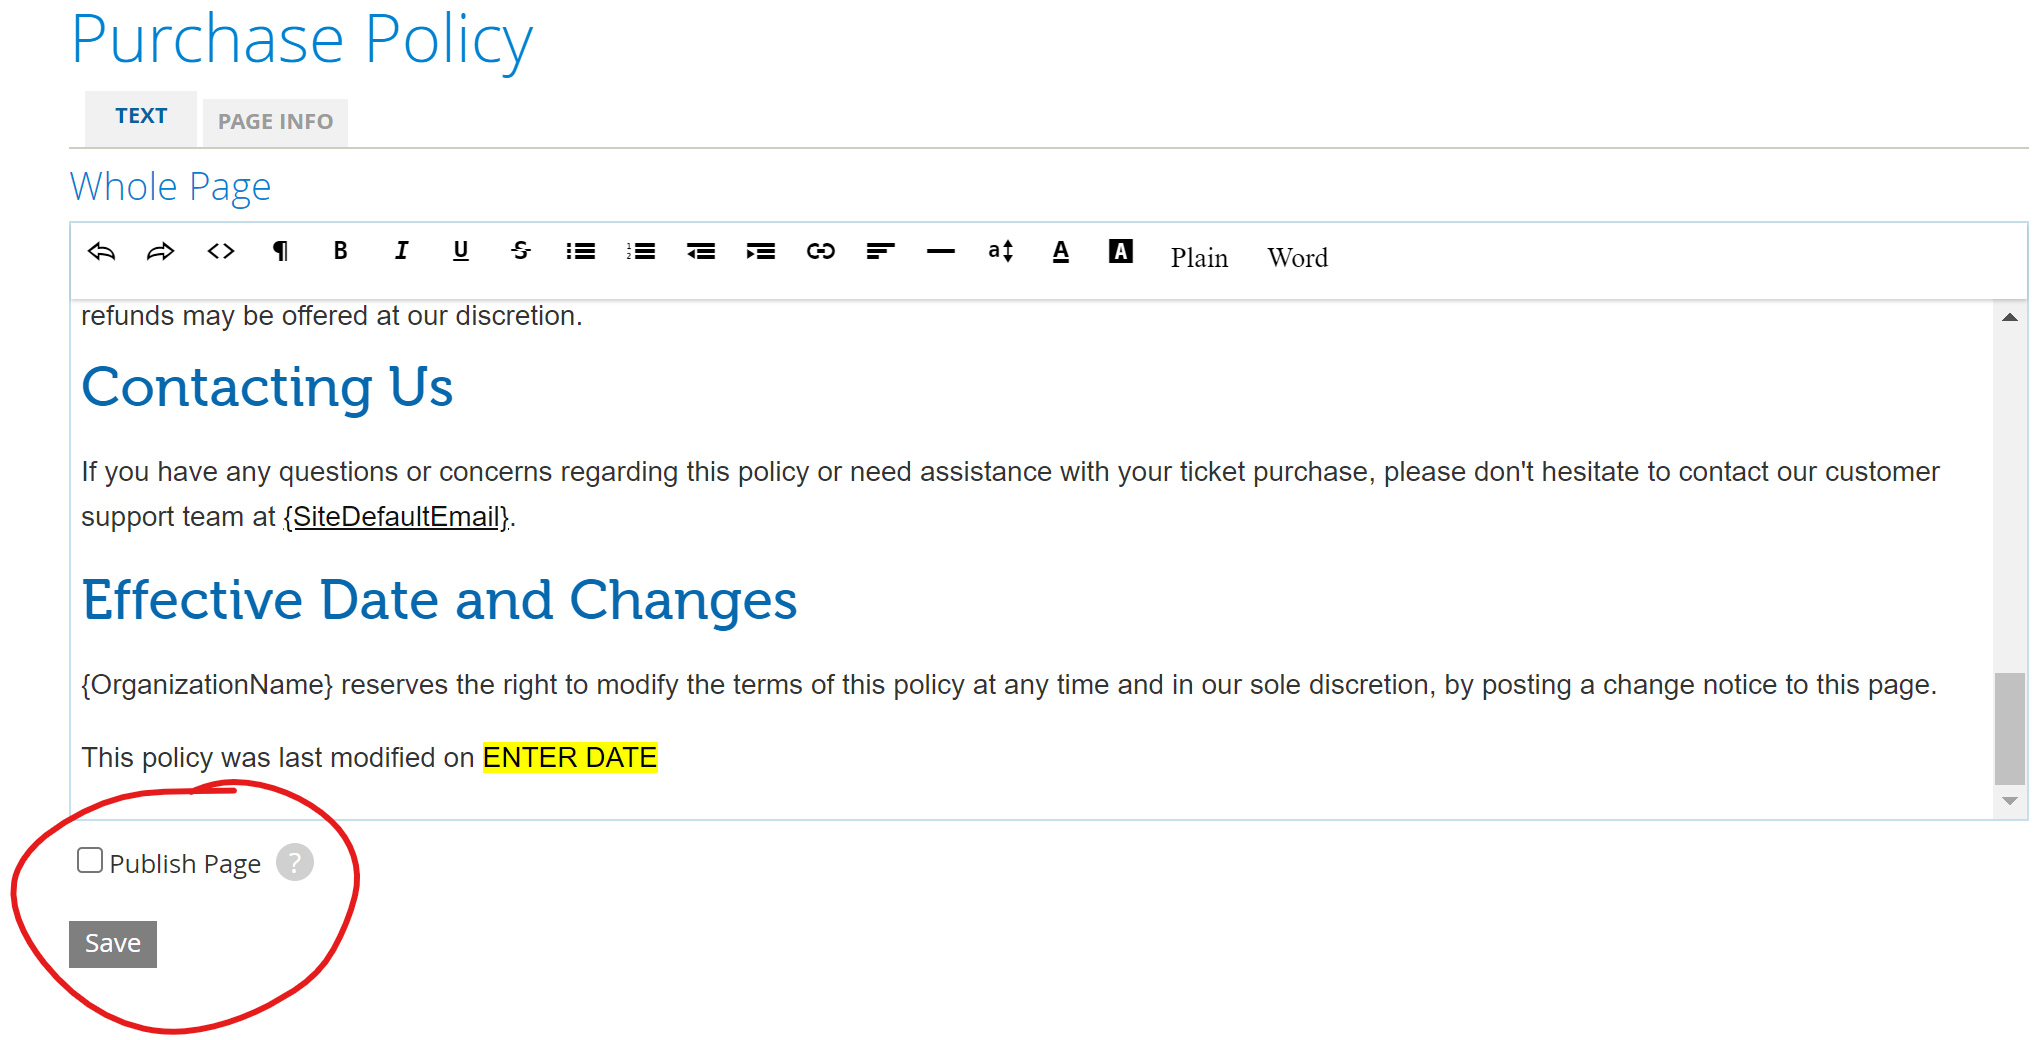
To update your purchase policy and set it to be a requirement for online purchases:
- Log into Spark and navigate to Commerce > Commerce Settings.
-
Scroll down to the section labelled SaffireTix Delivery Methods.

- Make sure that checkbox in front of Enable the purchase Policy page is checked.
- Select Edit Content.
- Update the policy using the WYSIWYG. You do not need to change anywhere on the Policy that is using the text {OrganizationName} or {SiteDefaultEmail} unless you wish these to be different than what is in your Site Settings.
-
After you've completed all of the content and changed out the DATE at bottom of the Policy, you will want to check the Publish page checkbox and click Save.
-
Select the hyperlink at the end of 'Make acceptance mandatory in the checkout process by clicking here'. This will take you back to your Commerce Settings page.

- Scroll down to where it says Online Shopping Cart Options.
-
Under the Review Page heading, check the box that says Require Purchase Policy acceptance at Checkout.

- Scroll to the bottom of the page and click save.


Note: Be sure to update the DATE on the bottom of the Policy before publishing.
Customer View
When enabled and required for your customers, they will see this checkbox at the bottom of the review page before they submit their order. Not only will your customers have to check the box, but this will open the policy in a popup that they have to scroll through to ready in order to accept and proceed to Complete Purchase.

The name of this policy can be changed to suit your need on the Edit Content page by switching to the Page Info tab.
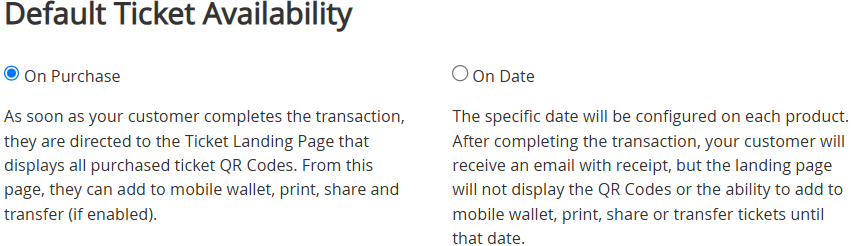
Default Ticket Availability
Controls when customers can access their tickets after purchase. The “On purchase” option makes tickets instantly available on the Ticket Landing Page, allowing customers to print, share, transfer, or add them to a mobile wallet. The “On date” option delays access until a set date, hiding QR codes and ticket actions until then.
Online Shopping Cart Options
The checkout process is made up of 3 pages: Checkout, Review, and Confirmation. With each section of the Delivery Cart Add-Ons, we allow you to customize the following on each checkout page: Header, Footer, Pixels Head tag, and Pixels Body tag.

- These fields allow you to add custom content such as text, HTML, or tracking pixels. More importantly, you can provide your customers with instruction, help, or incentives through the checkout process. This is often used for placing banner ads above the shopping cart.
- The Review page offers an additional feature of enabling a checkbox that requires your customers to "agree to terms & conditions" specified in your Privacy, Terms & Cookies. If utilizing this option, be sure that your refund/return/cancellation policy is clearly listed under Tools > Header Banner > Privacy, Terms & Cookies
- You also have the option of editing the header and/or footer of the Mobile Receipt
What Saffire Manages for You
There are some commerce settings that Saffire manages for you.
- Setting or updating an order prefix code
- Supported credit card types (Visa, MasterCard, Amex, Discover)
- Enabling or updating Abandoned Shopping Cart emails settings
- Enabling or updating 3D Secure fraud protection settings
- Enabling or updating Fluent/Stay22 advertising partnership settings
- Updating online transaction limits (units per order)
- Setting or updating Reserved Seating cart timeouts