
8.6 Release Notes
IN THIS ARTICLE
Invoice Importer
Seat Map Updates
Entrances on Tickets
Ticket Note on Landing Page
Other Improvements
We are excited to share with you some new features that have just launched! We encourage you to read the notes below and try out the new features for yourself. Please reach out via support@saffire.com if you have any questions!
NEW Import Invoices Tool
Location: Commerce > Utilities > Import Invoices
With this new Import tool, you can now generate invoices in bulk for products or events at your Organization.
Some great use cases for this include:
- Renewal of specific seats from year-to-year events
- Sponsorship Orders that will be paid before they gain access to their tickets
- Bulk Orders for schools or secondary organizations
📢 When you're ready to import your first batch of Invoices, reach out to your Ticketing Account Manager and you can walk through the steps together!
Part 1
Navigate to the Import Invoices page in Spark: Commerce > Utilities > Import Invoices
- click Create Import - this opens a popup window
- click Download Excel Template
Note: The template opens to an Examples tab showing a variety ticket products. You don't have to remove these examples when you import the file - just reference this tab for the data you need to include on the Invoices tab of the same Excel file.
The heading types above each of the examples should not be included on the Invoices tab - just add the appropriate customer & product data to each column.
- after adding your data to the template, click Choose File under Excel Import
- enter the Invoice Batch Name - this is a reference point that you will be able to see on the Purchases Report
- enter the Invoice Due Date - This is the due date for ALL invoices included in the import, you can manually change dates of each invoice if you need, but there is no other bulk date setting.
- click the Validate Import button at the bottom of the window

✅ This validation step verifies that the tickets you are adding to orders are available.
- For reserved products, this validation includes things like verifying that a seat with a matching section/row/seat exists, hasn't been sold, etc.
- For general admission, validation includes things such as there is a set Quantity requested for each invoice and that Qty doesn't exceed any inventory thresholds set on the product.
Part 2
After successful validation, you will see a list of the number of invoices that will be created as part of this import. THIS IS NOT THE FINAL STEP!
- Verify the number of Invoices that will be created, then click the Create Invoices button

Part 3
After you click Create Invoices, they will be generated in the background and you will receive an email once they are completed and ready to be sent to your recipients.
‼️Invoices are not automatically sent, you will need to navigate to the Purchases Report and use the bulk action tool to send any 'Not Sent' invoices to your customers.
- Click the Review Batch button from the email to view all of the batched invoices and their status.

Part 4 - final steps
- Navigate to the Purchases Report in Spark: Commerce > Reports > Purchases
- Filter to Type > Invoice > Not Sent

Use the Actions dropdown to send an Invoice Reminder.
- Check the box(es) of any/all invoices you want to send. The box in the blue bar will select all.
- Select Invoice Reminders from the Actions dropdown

- You can change any of the content in the Email Invoice Reminders window. Note the Email Key displaying several 'tokens' which can be used to automatically add invoice data to the message.
- Once you've fine-tuned the content, click Send
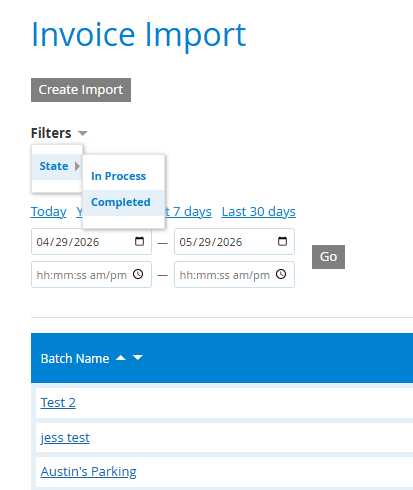
Invoice Import Dashboard
After sending invoices, you review their progress & history from Commerce > Utilities > Import Invoices
- Filter invoices 'In Process' or 'Completed'
-
You can click on a batch name to View Invoices (which returns you to the Purchases report) or Export Detail which downloads an Excel file.

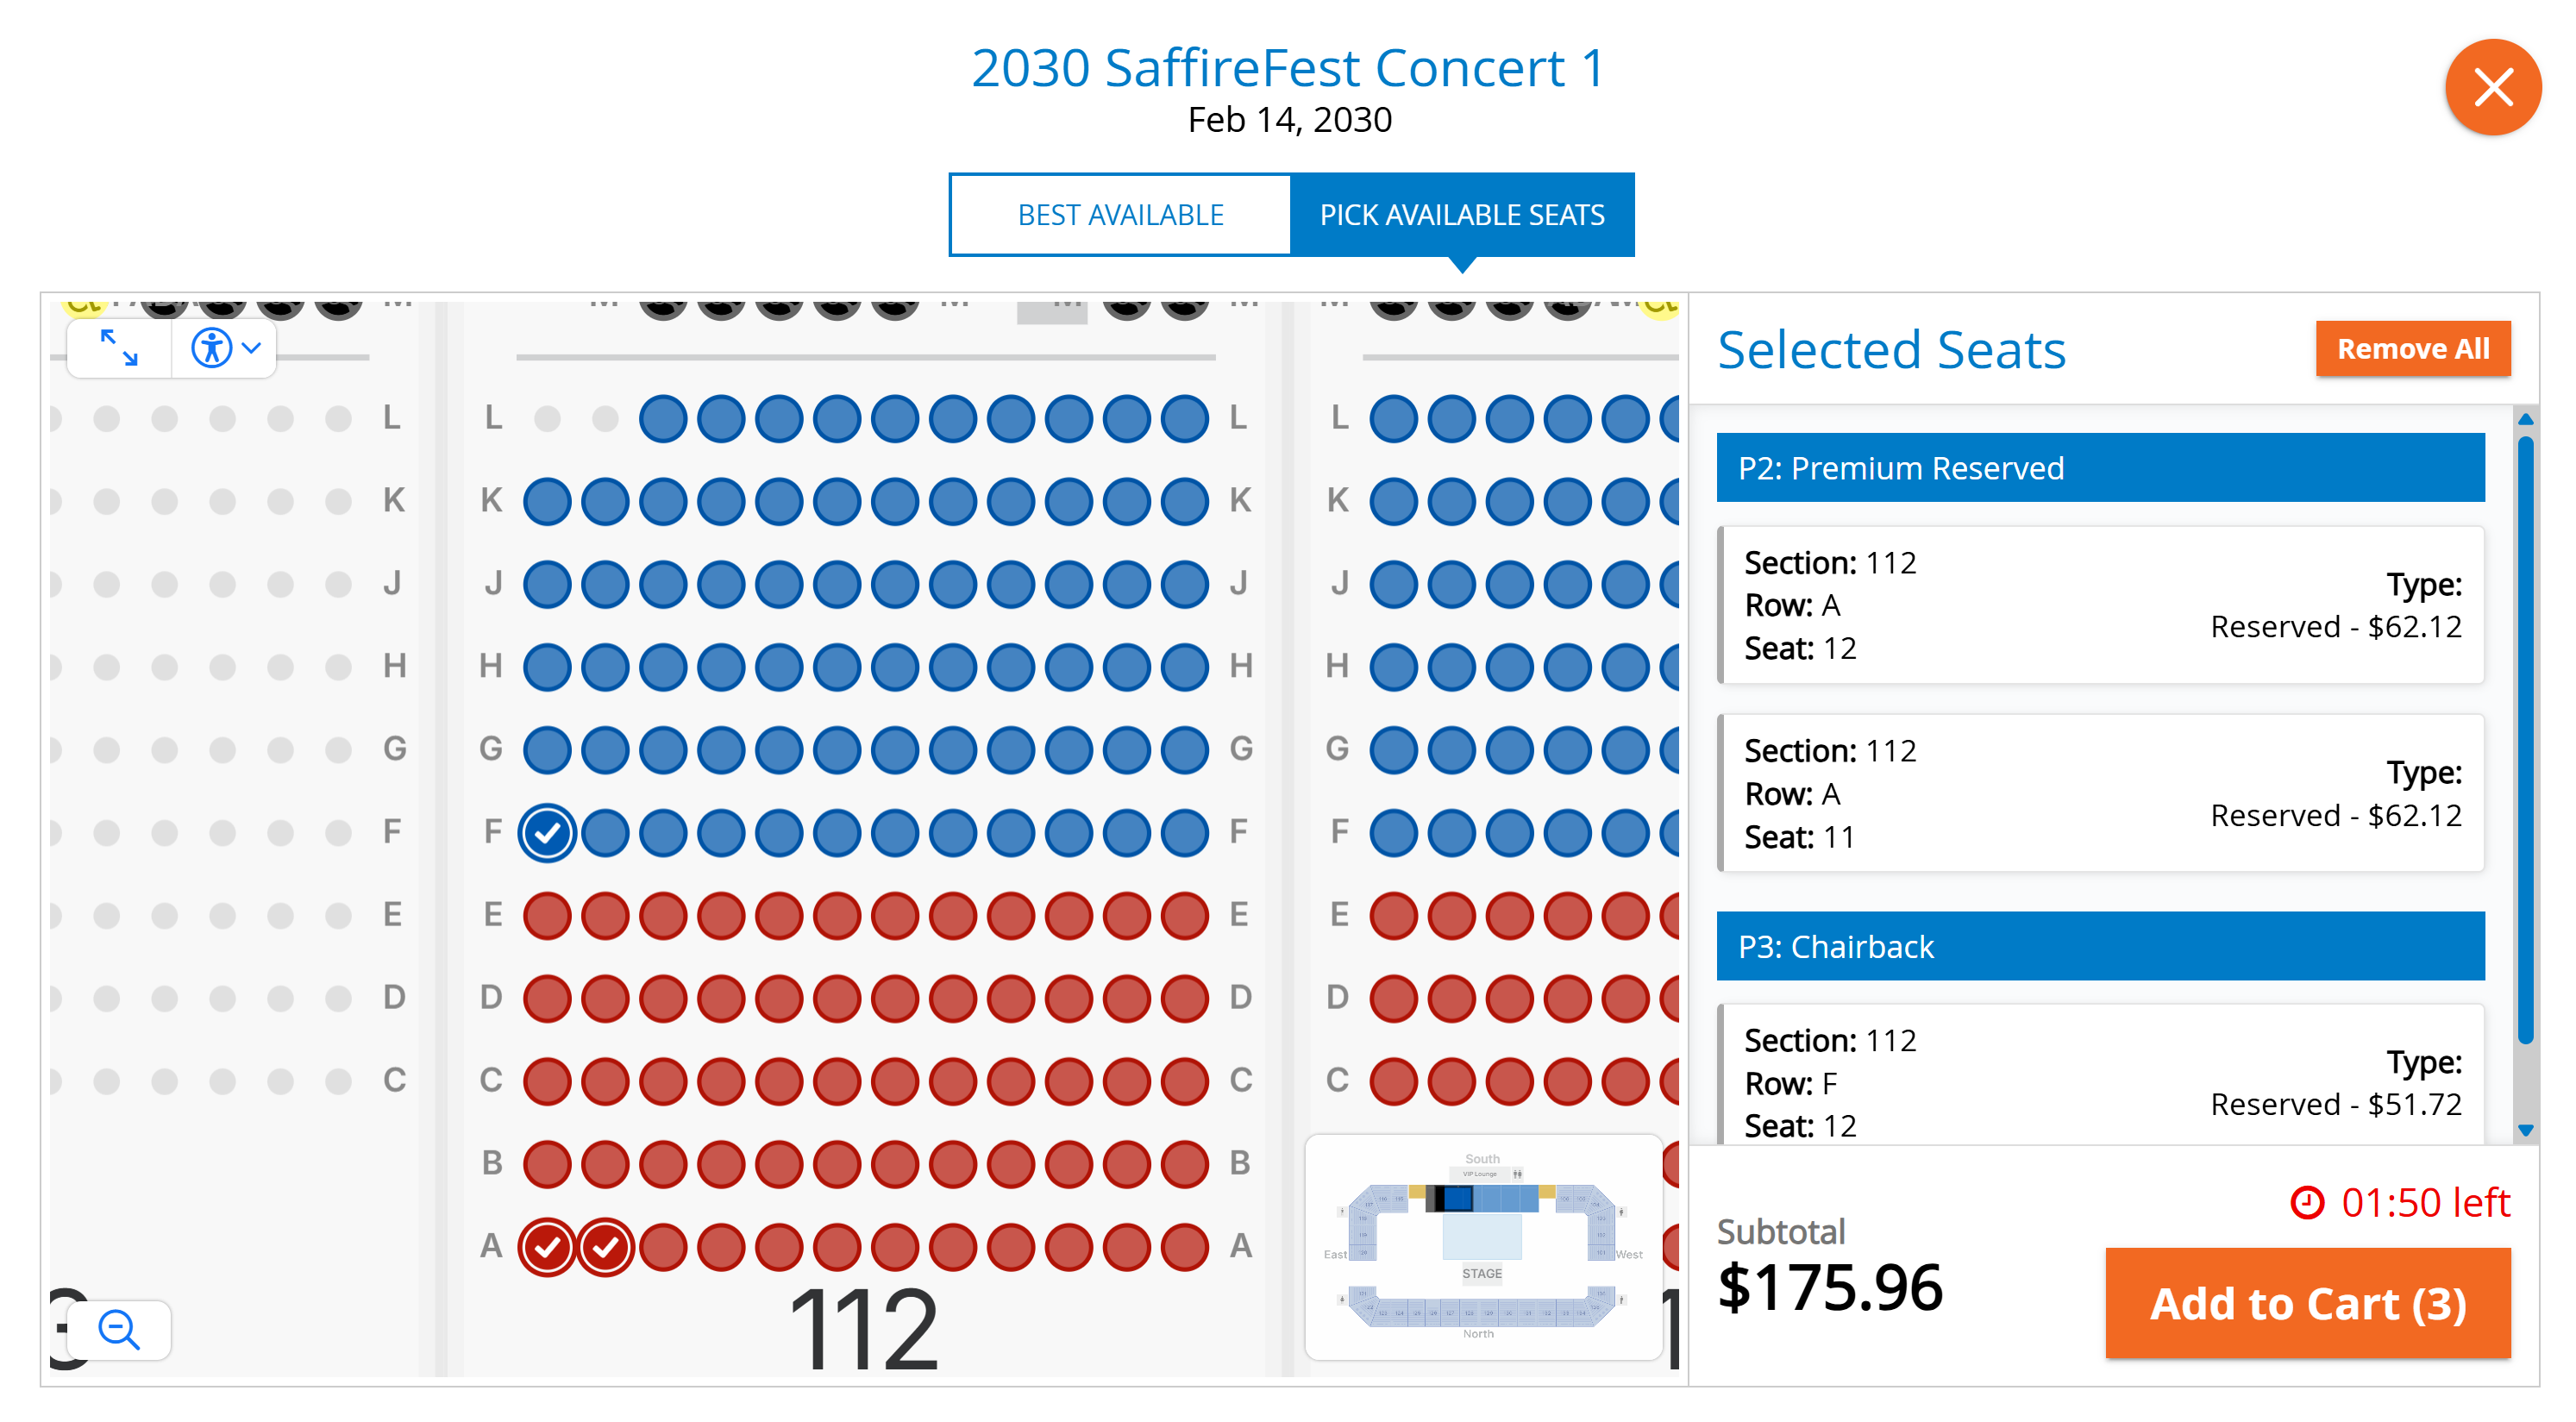
Seat Map Updates
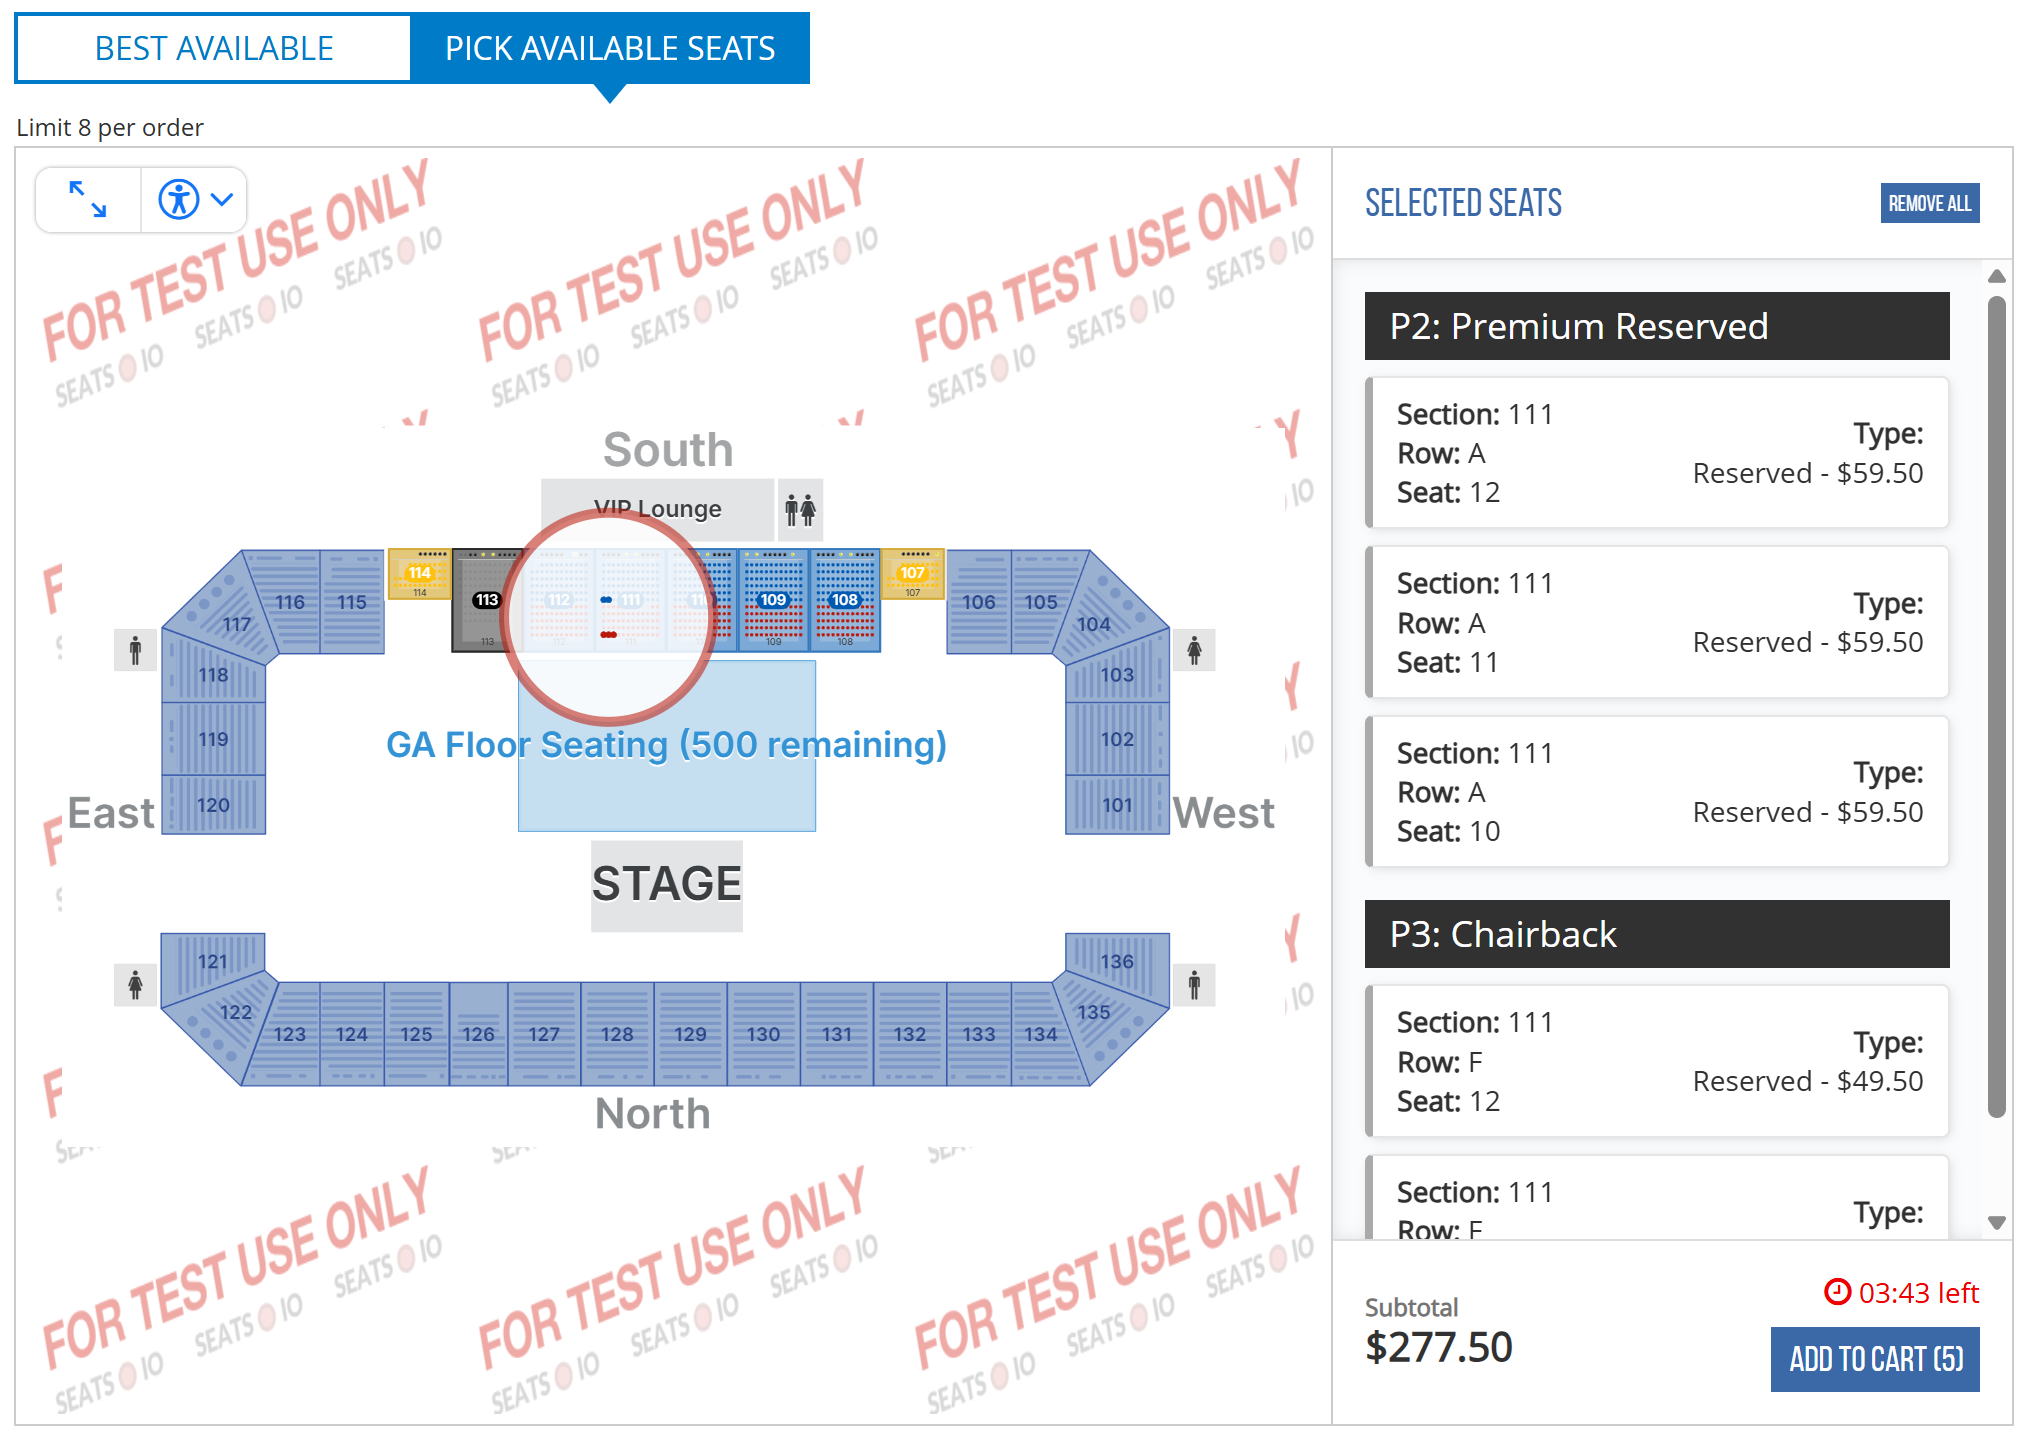
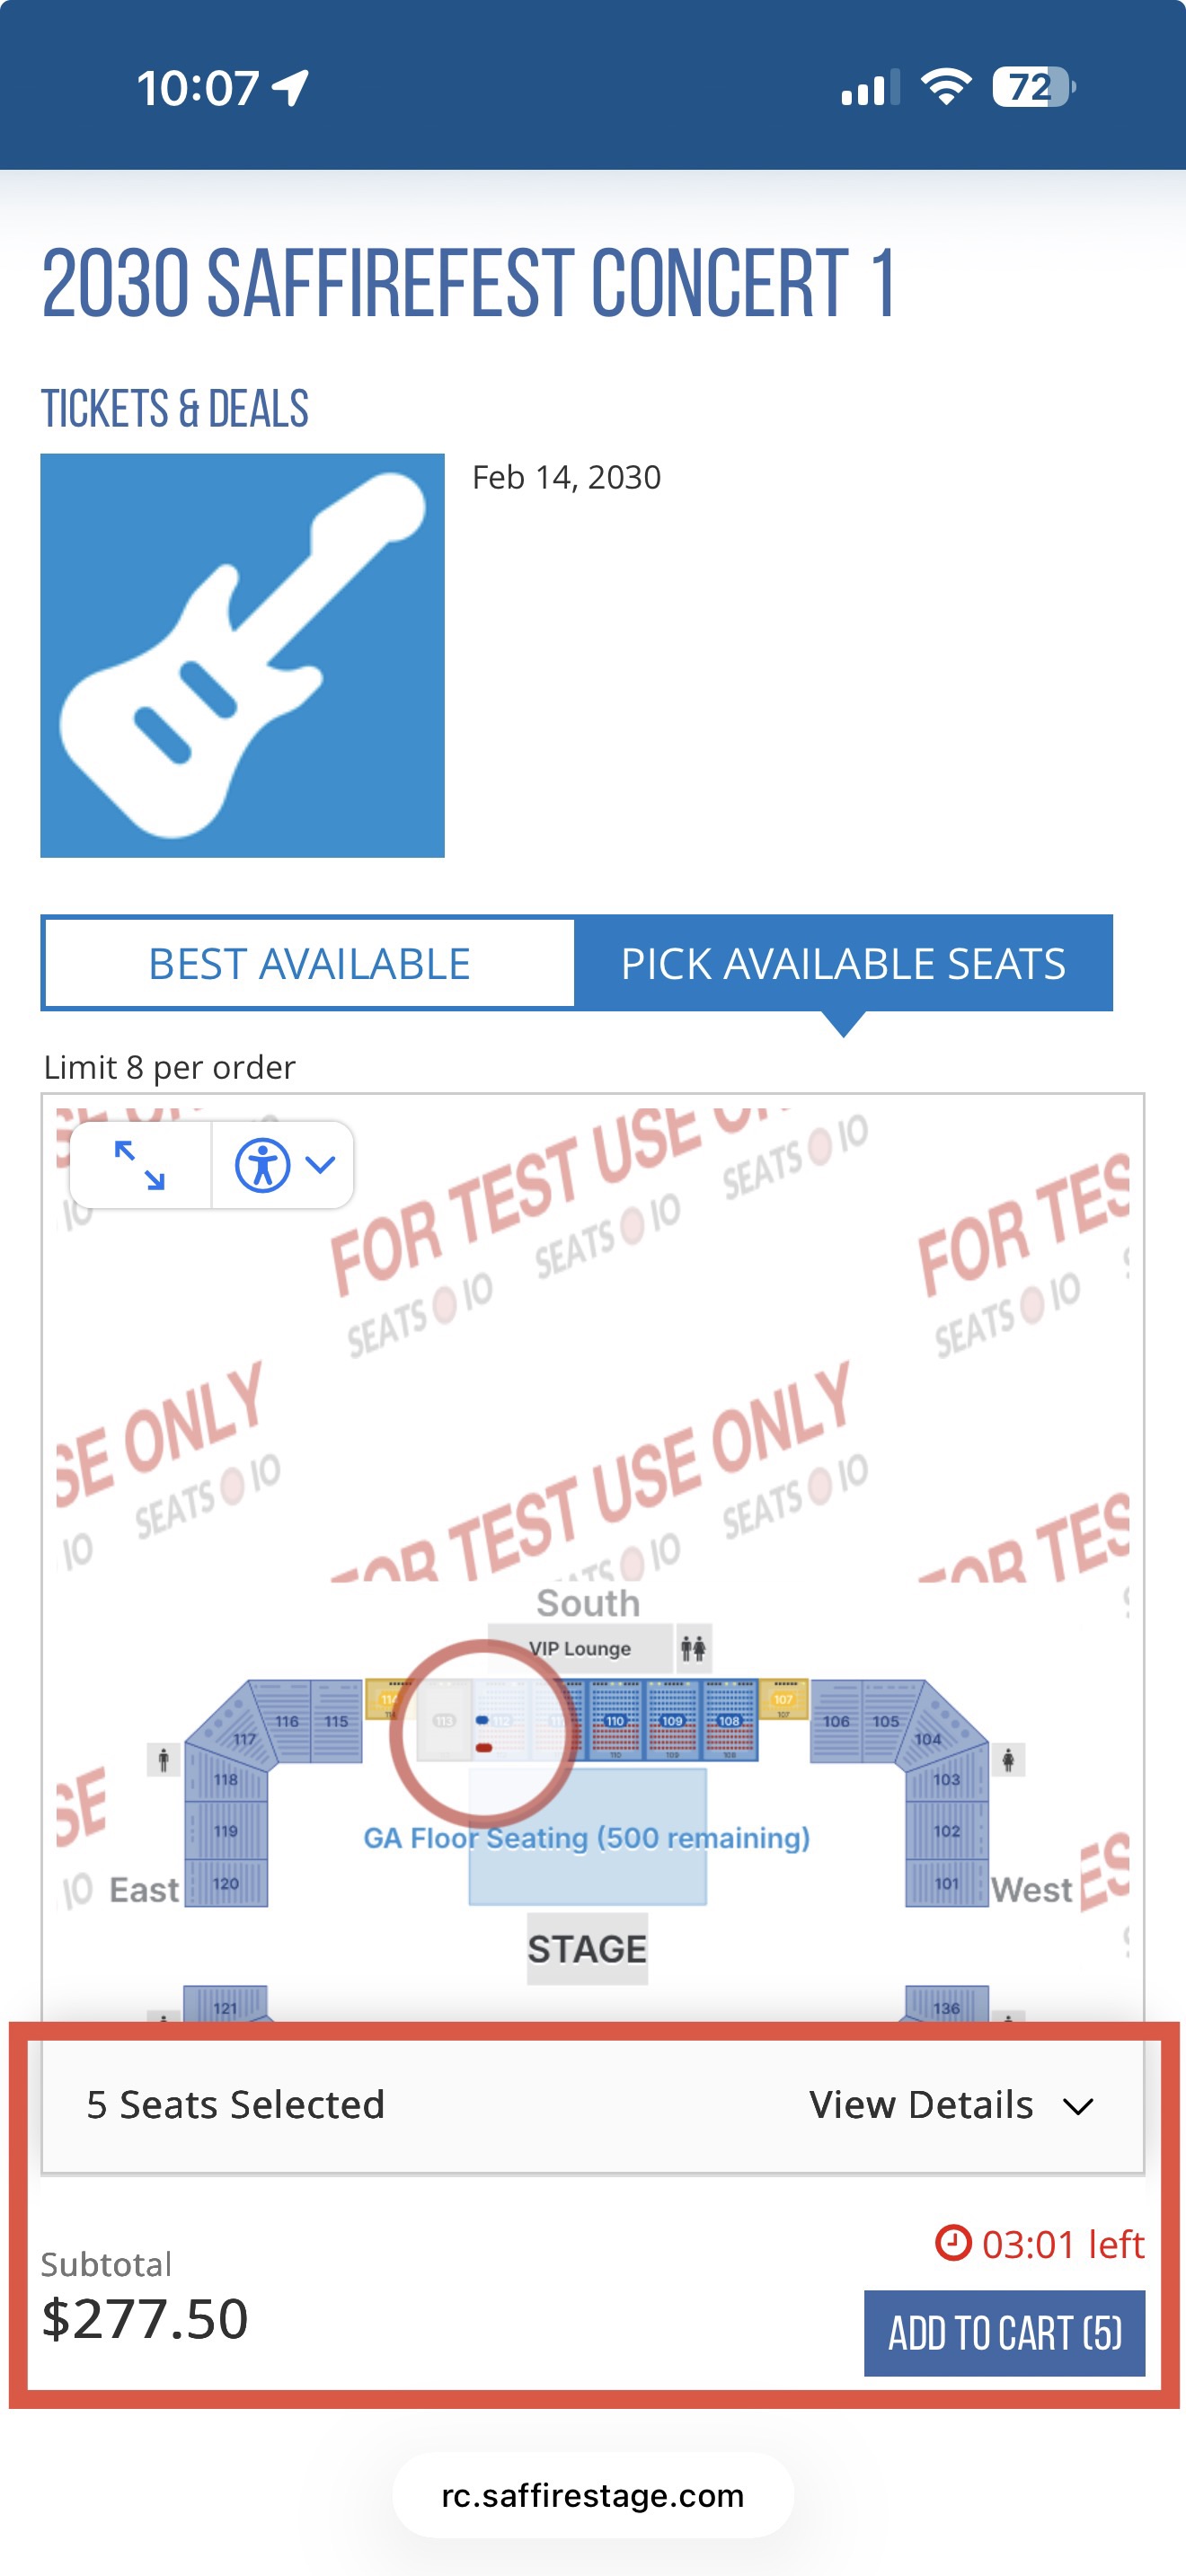
We have improved the selection of seats for you customers to optimize for space and screen sizes. This includes a new layout for Pick Your Seats as well as a cleaner selection screen for Best Available selection for tickets.
Pick Your Seat
On Desktop: This new seat map selector has a cart along the right side that will display your selected seats and have an ADD TO CART button visible to proceed with the checkout.
On Mobile: This new seat map selector displays how many seats are selected at the bottom and has the ADD TO CART button visible at all times to proceed with the checkout.
Best Available
On Desktop: You can select the number of tickets you need from the dropdown and then select the Price Category below. Each category will display it's price, or price range, as well as the remaining inventory available. After you Select your category, click SEARCH to get your seats and ADD TO CART to proceed with the checkout.
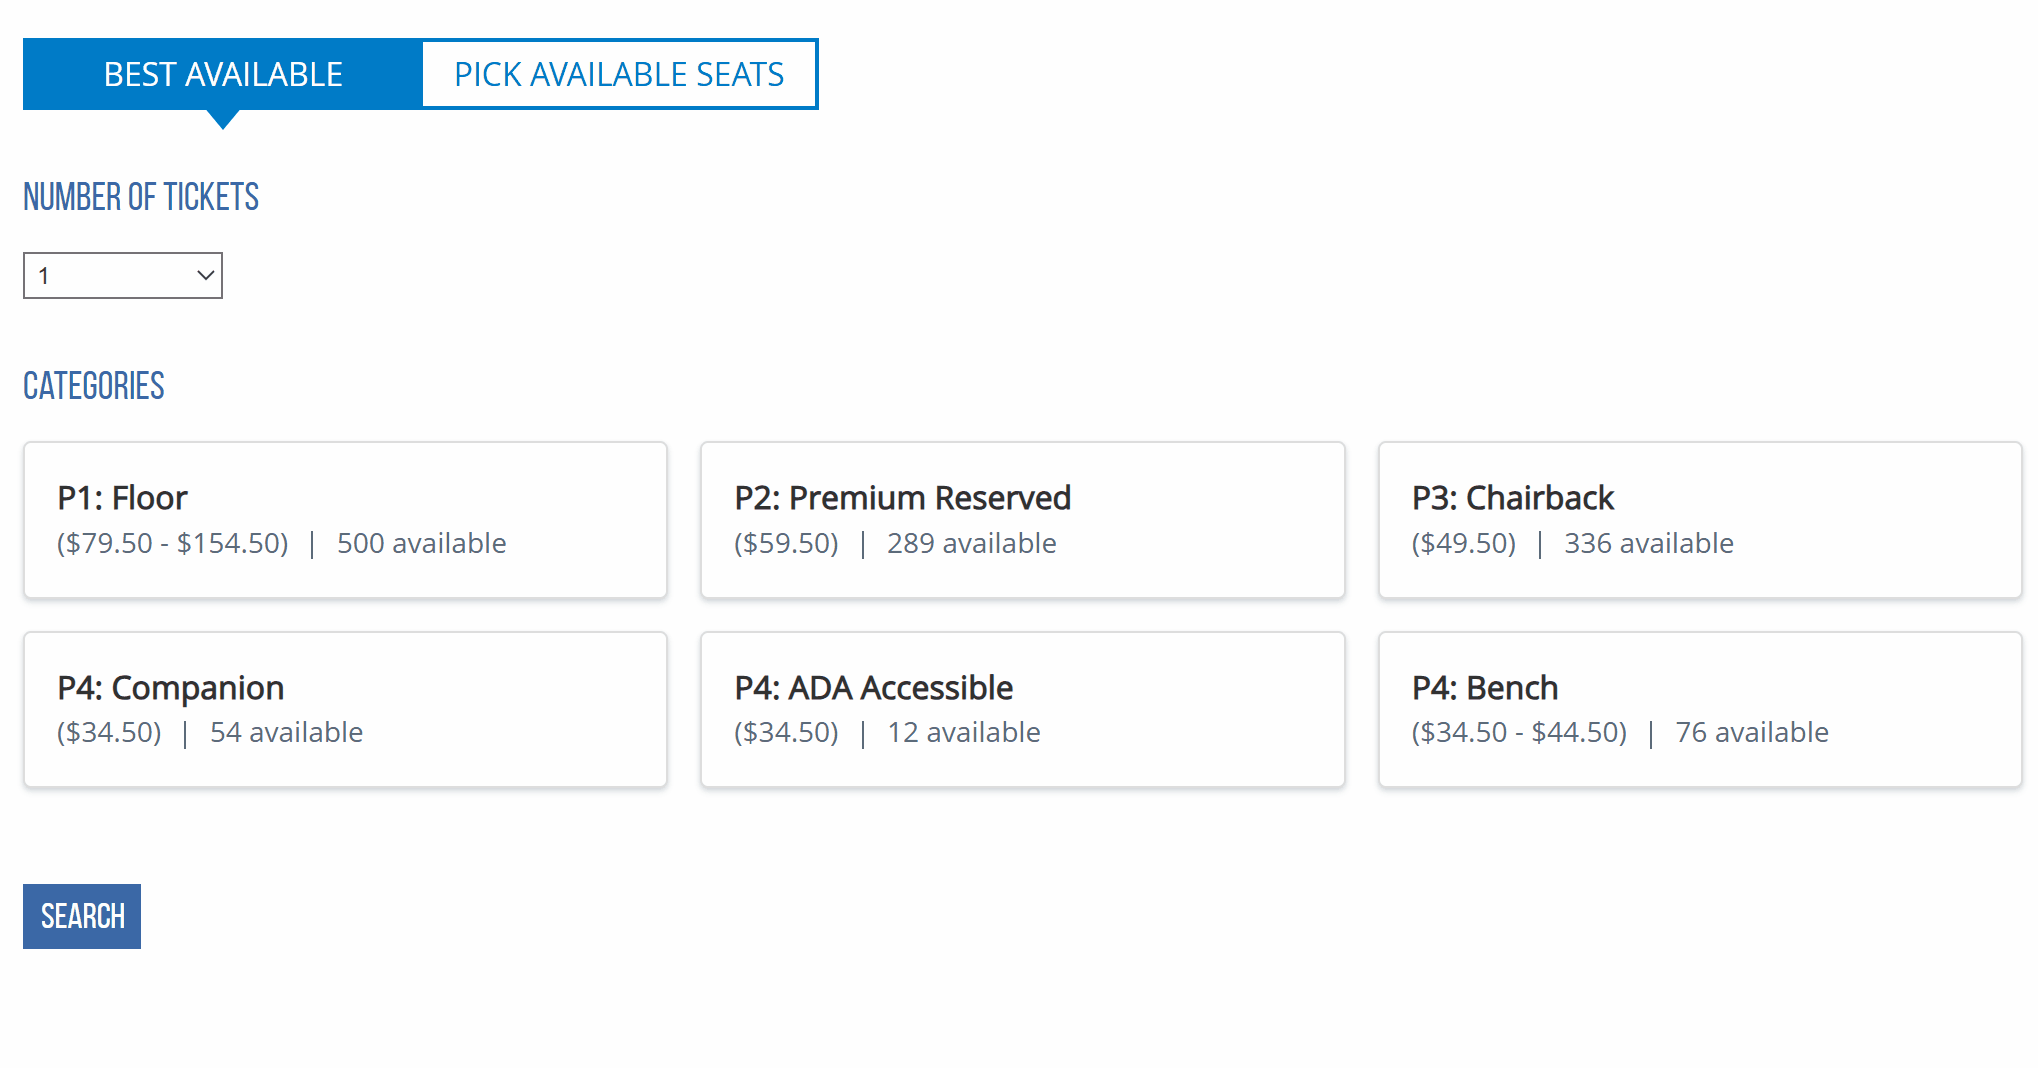
On Mobile: You can select the number of tickets you need from the dropdown and then select the Price Category below. Each category will display it's price, or price range, as well as the remaining inventory available. After you Select your category, click SEARCH to get your seats and ADD TO CART to proceed with the checkout.
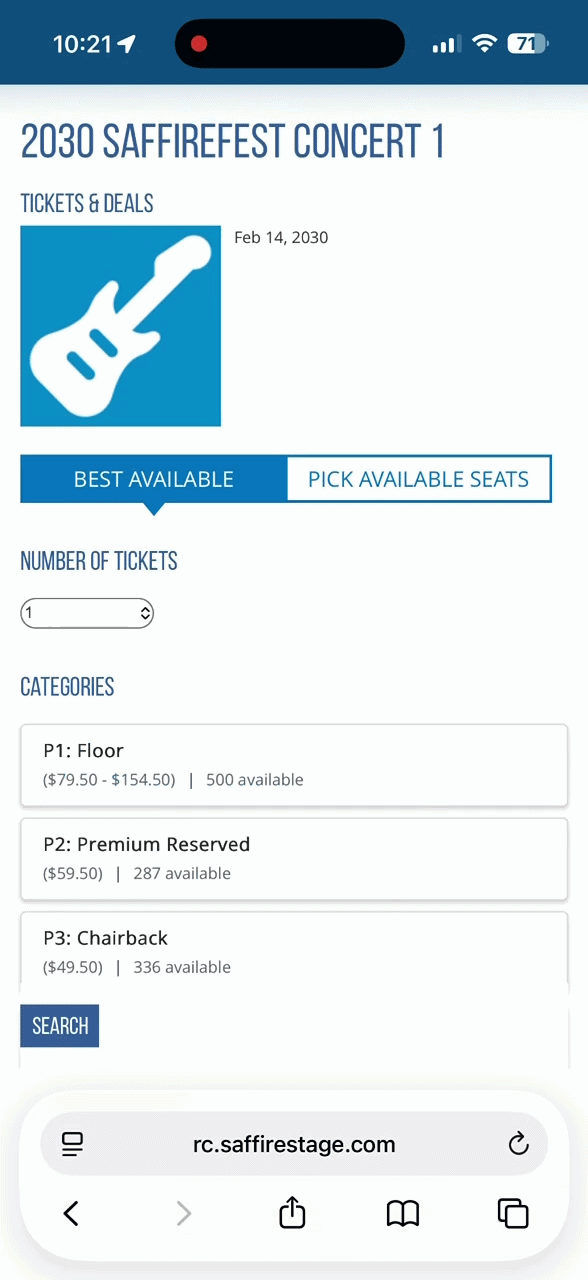
Kiosk & Web Box Office Displays:
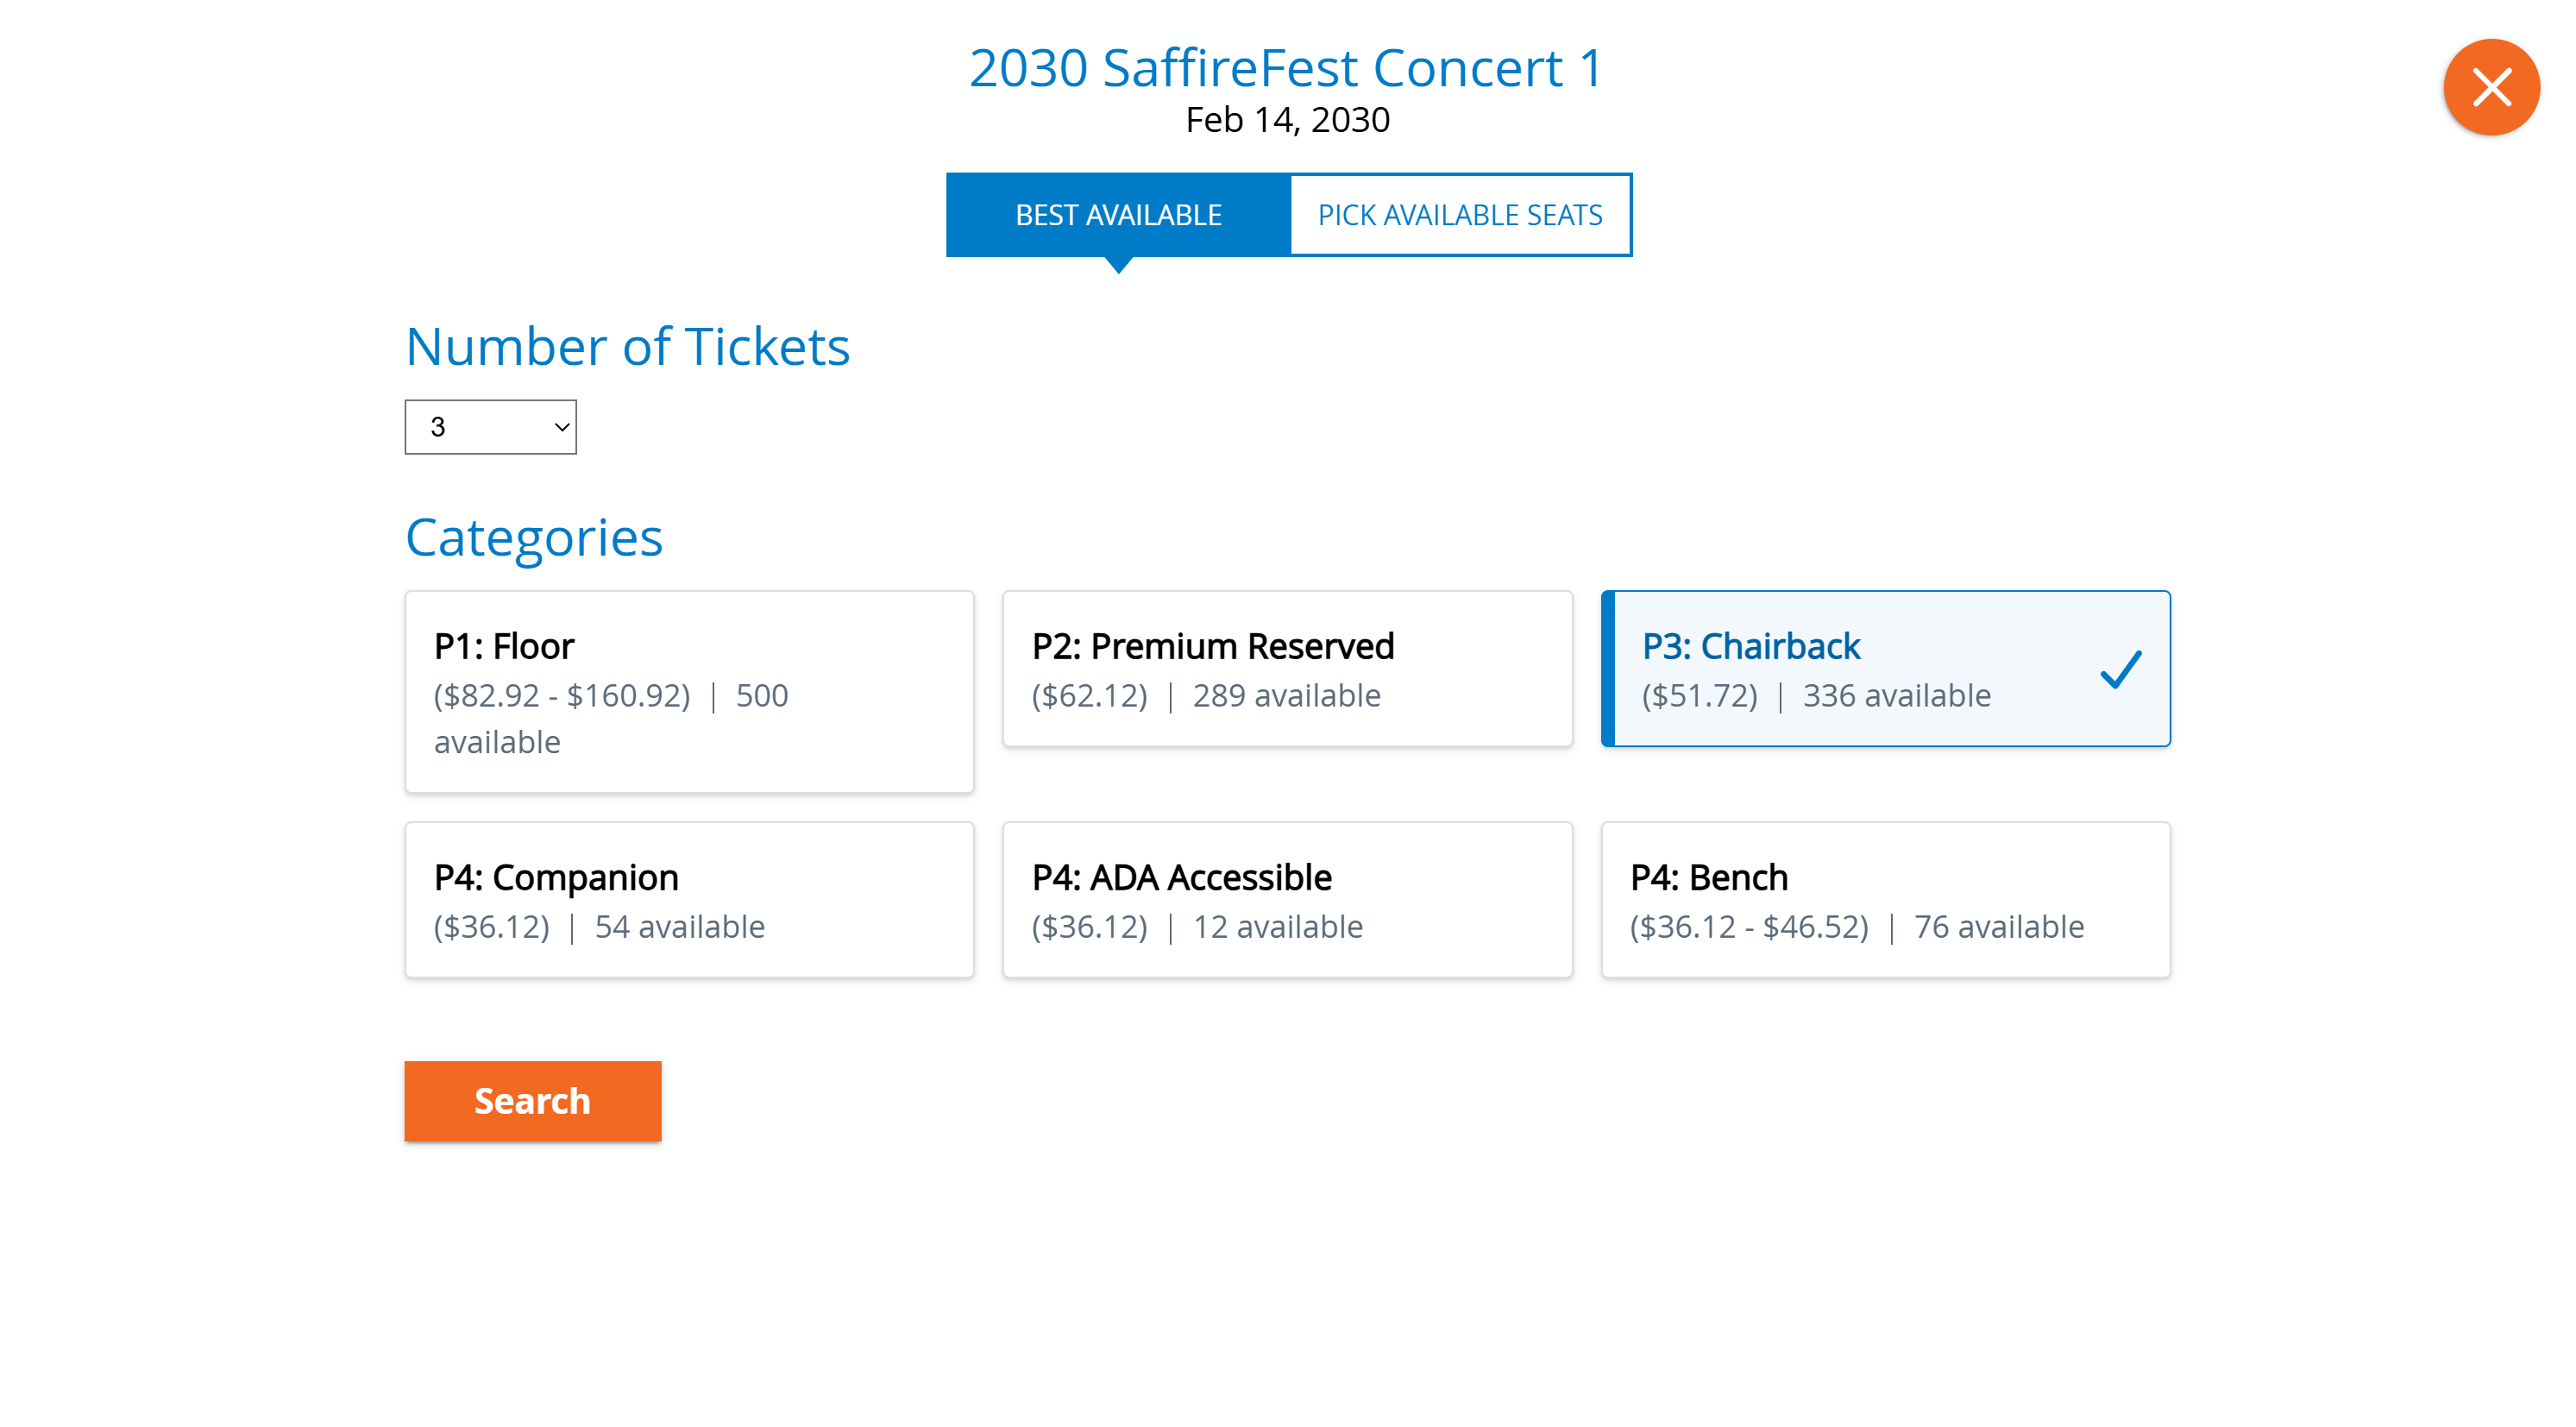
Note: If you need to modify the Category display order, reach out to support@saffire.com to get those changes.
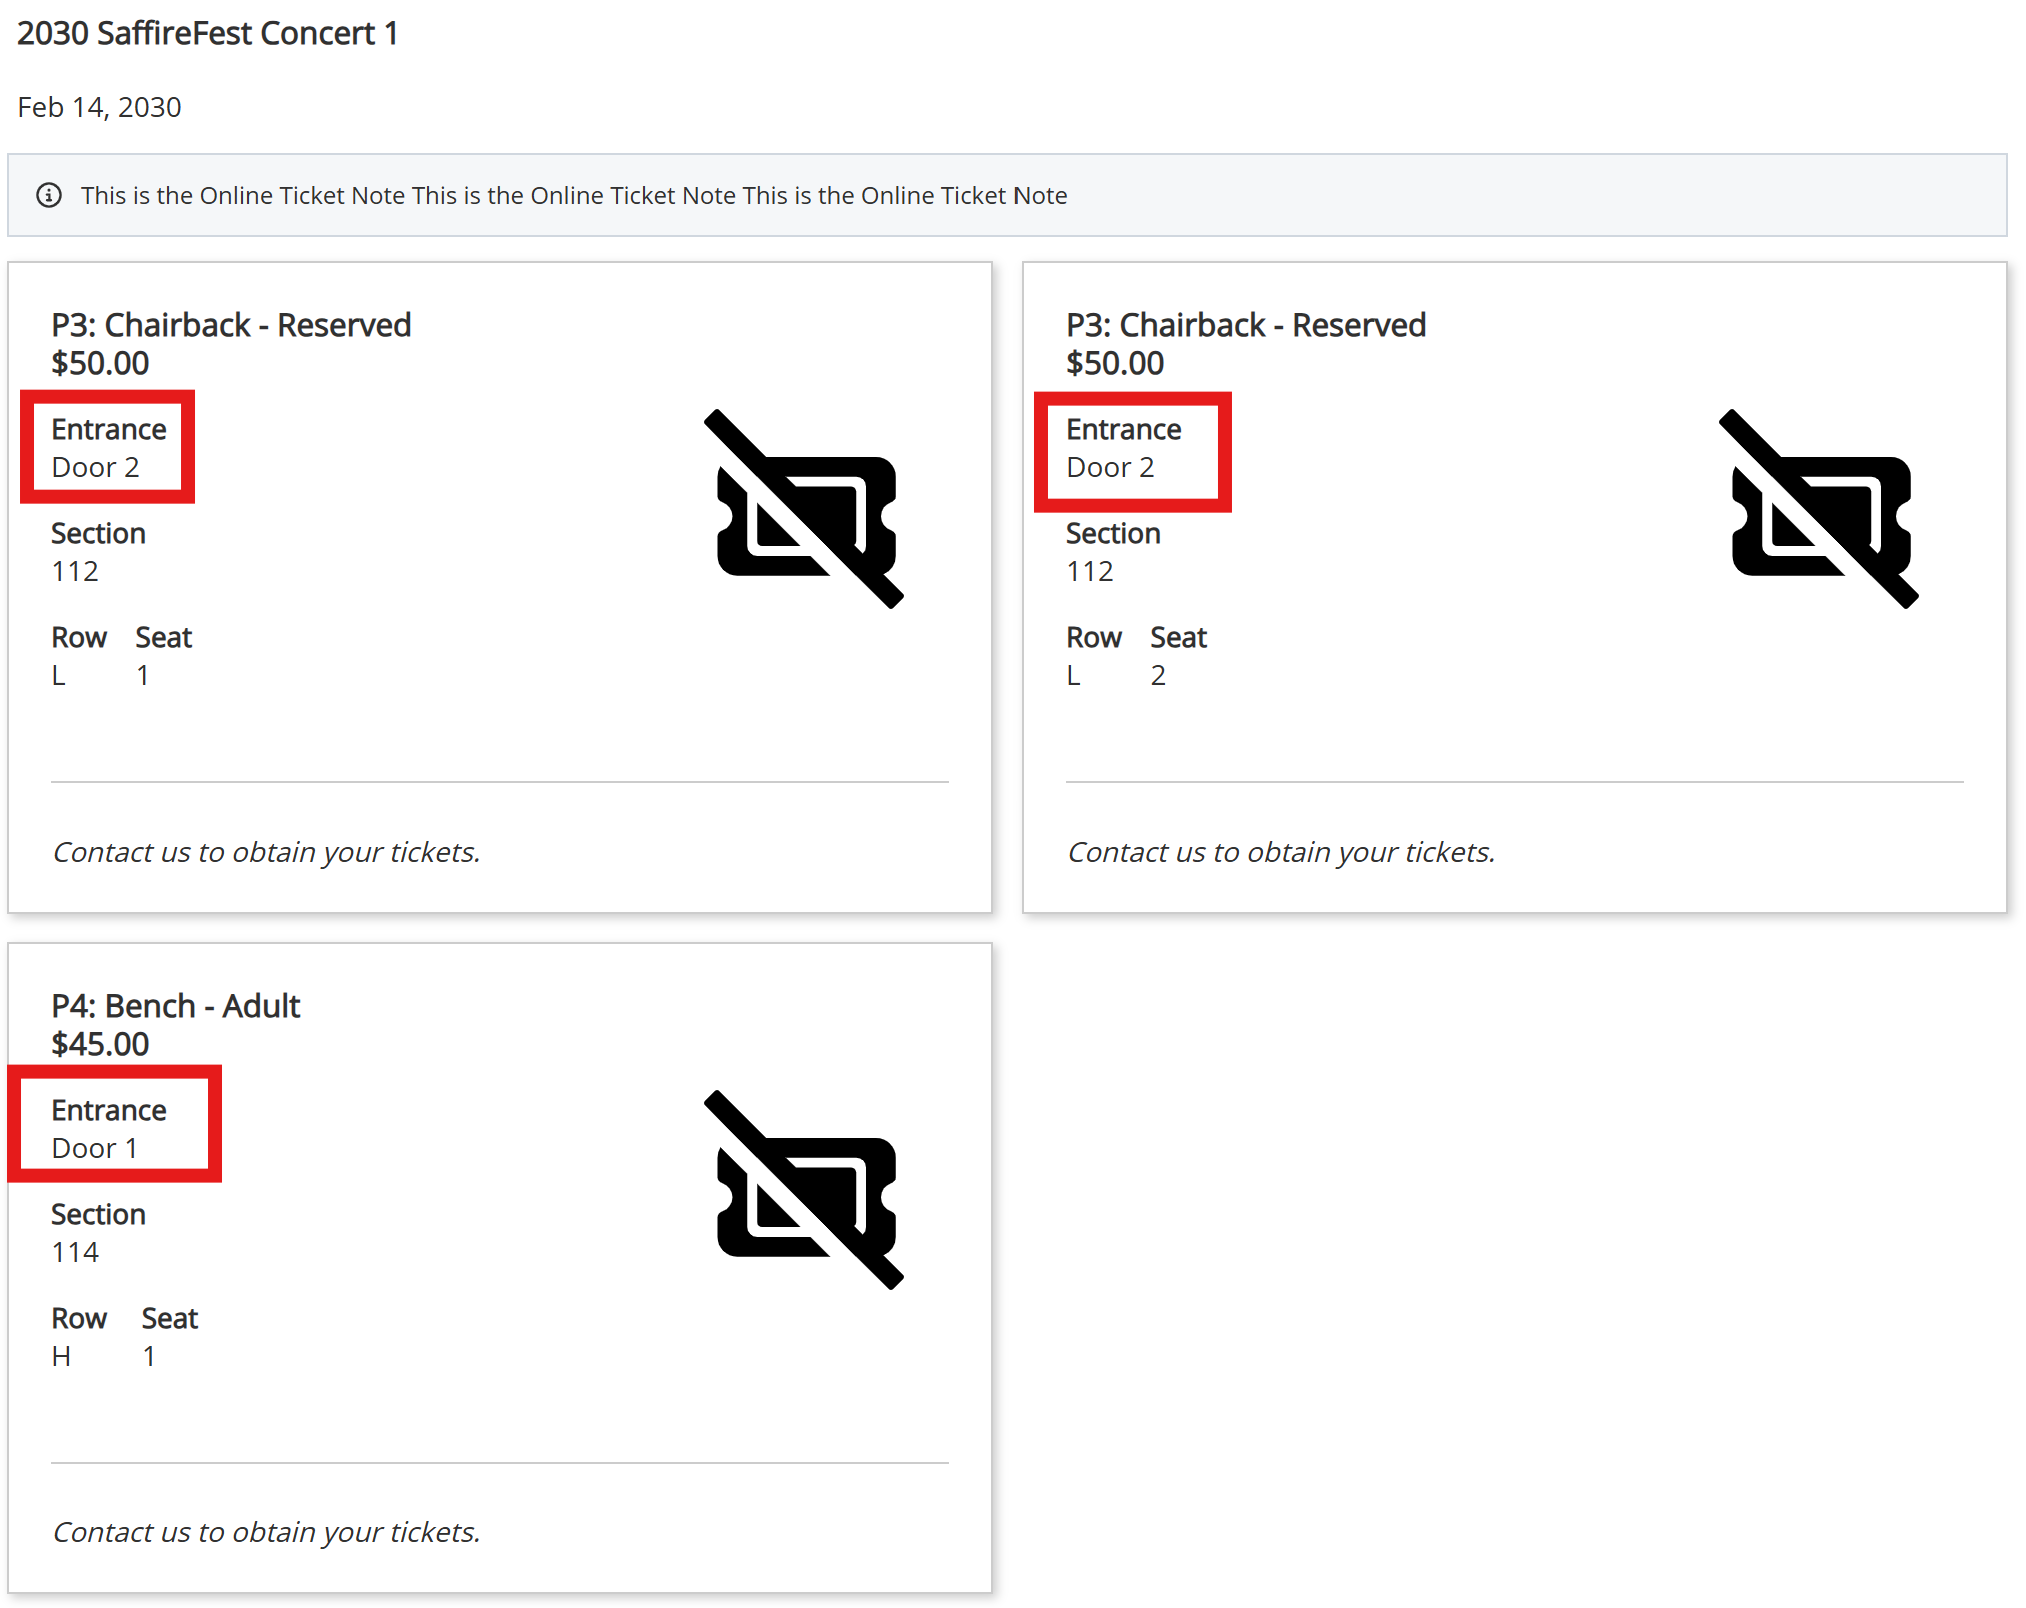
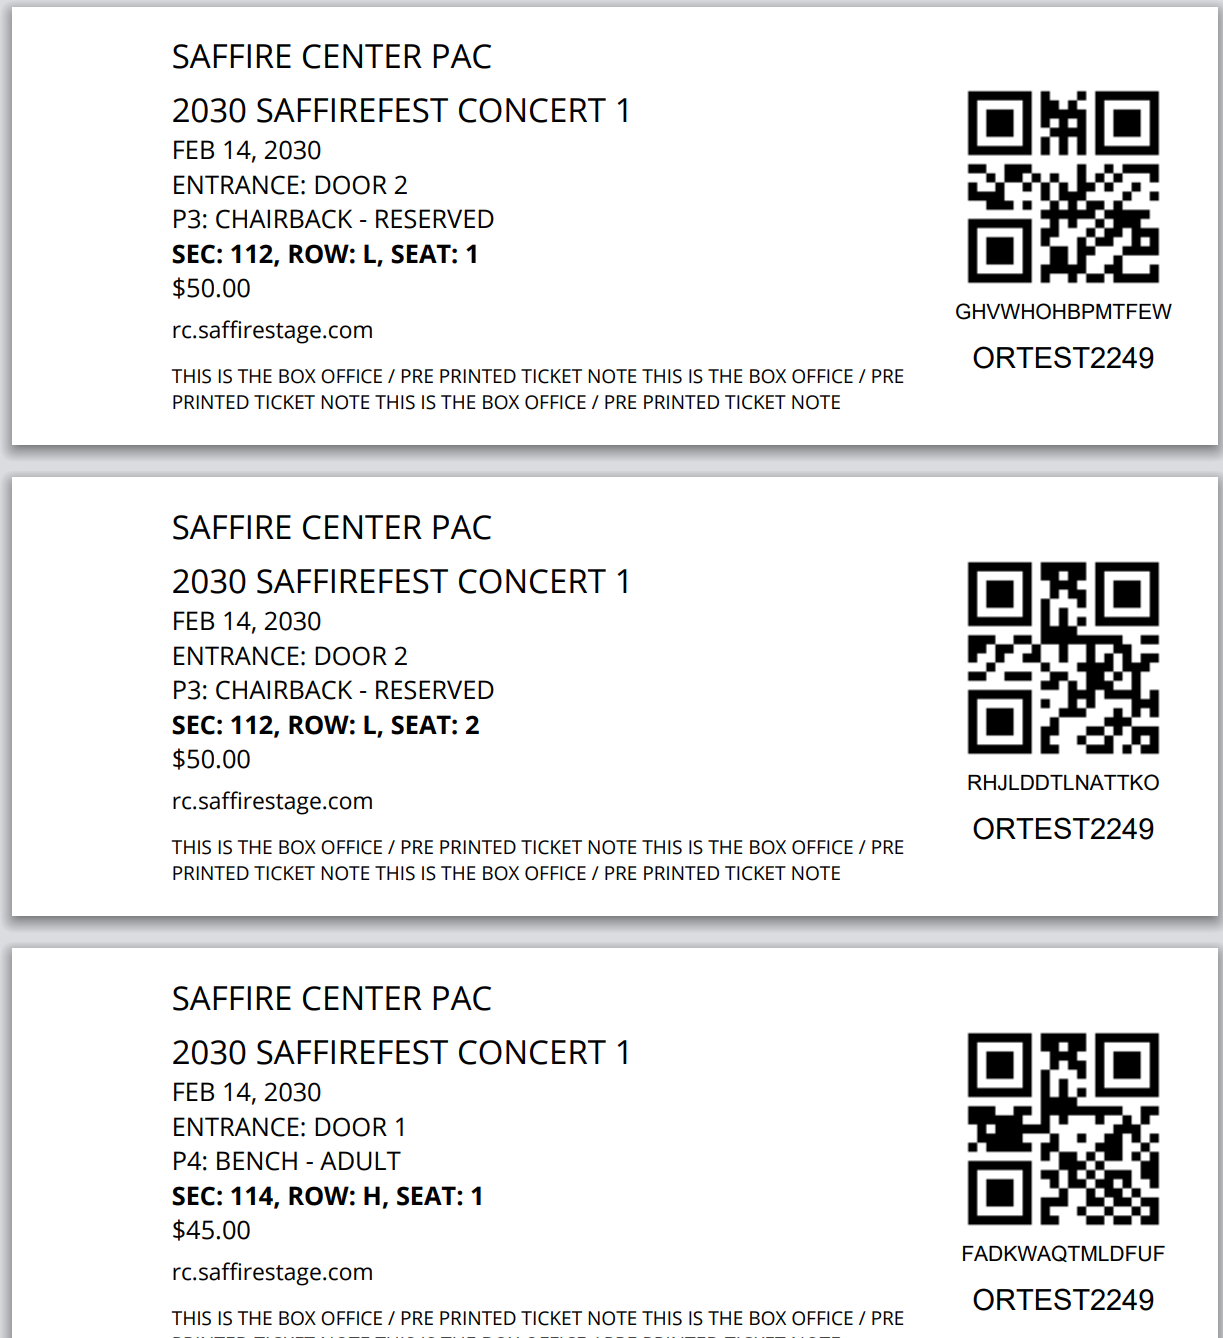
Entrances / Locations on Reserved Products
You can now display the Entrance or Location on your Reserved Seating products. This is configured per seat, meaning if you have a reserved map that there is a different entrance for certain seats in a specific row, you can display this everywhere the ticket is shown:
- Ticket Landing Page
- Print at Home Ticket
- Box Office 2x5.5 Ticket
- Apple Wallet / Google Wallet Passes
|
|
|
|
|
|
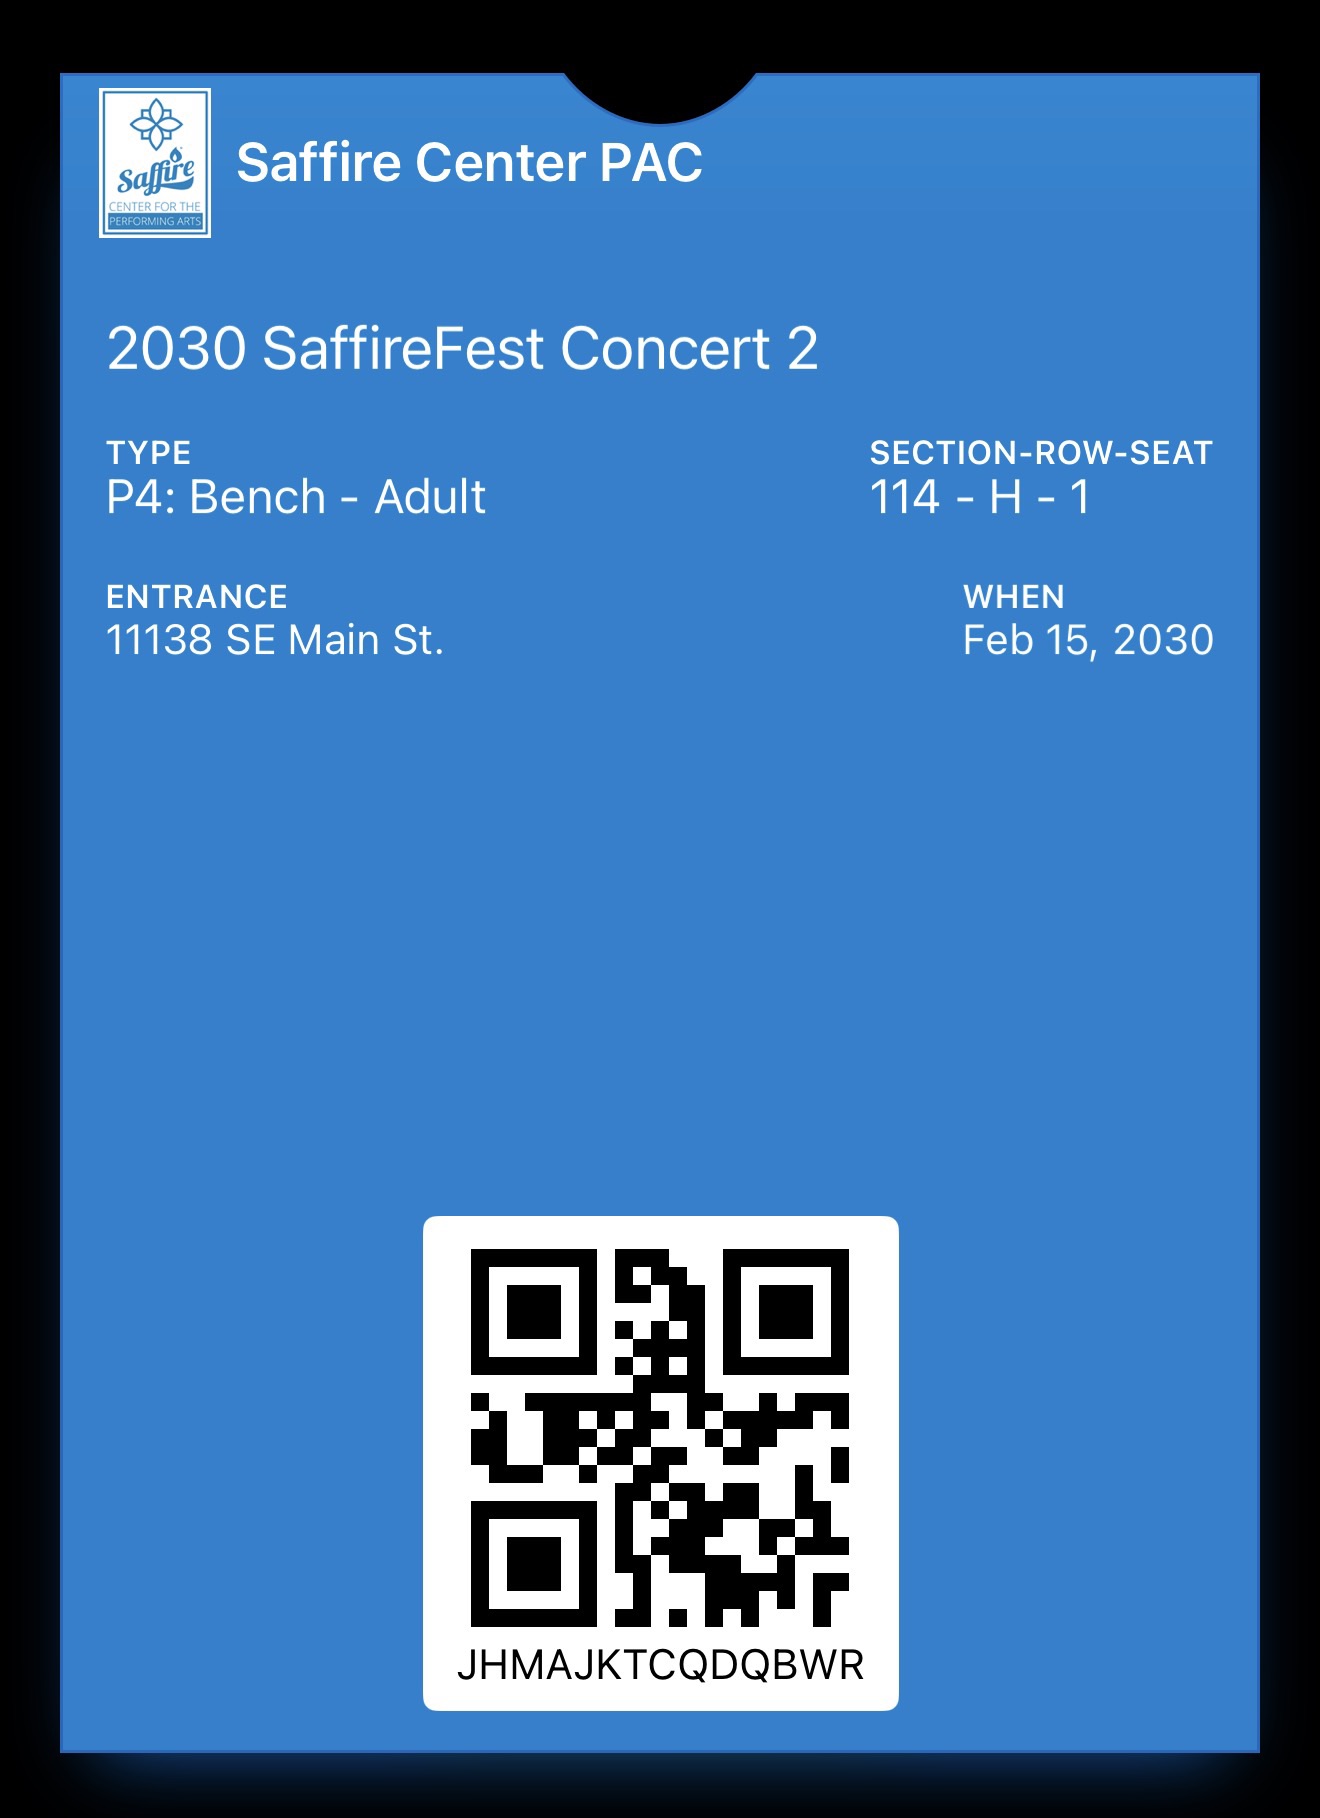
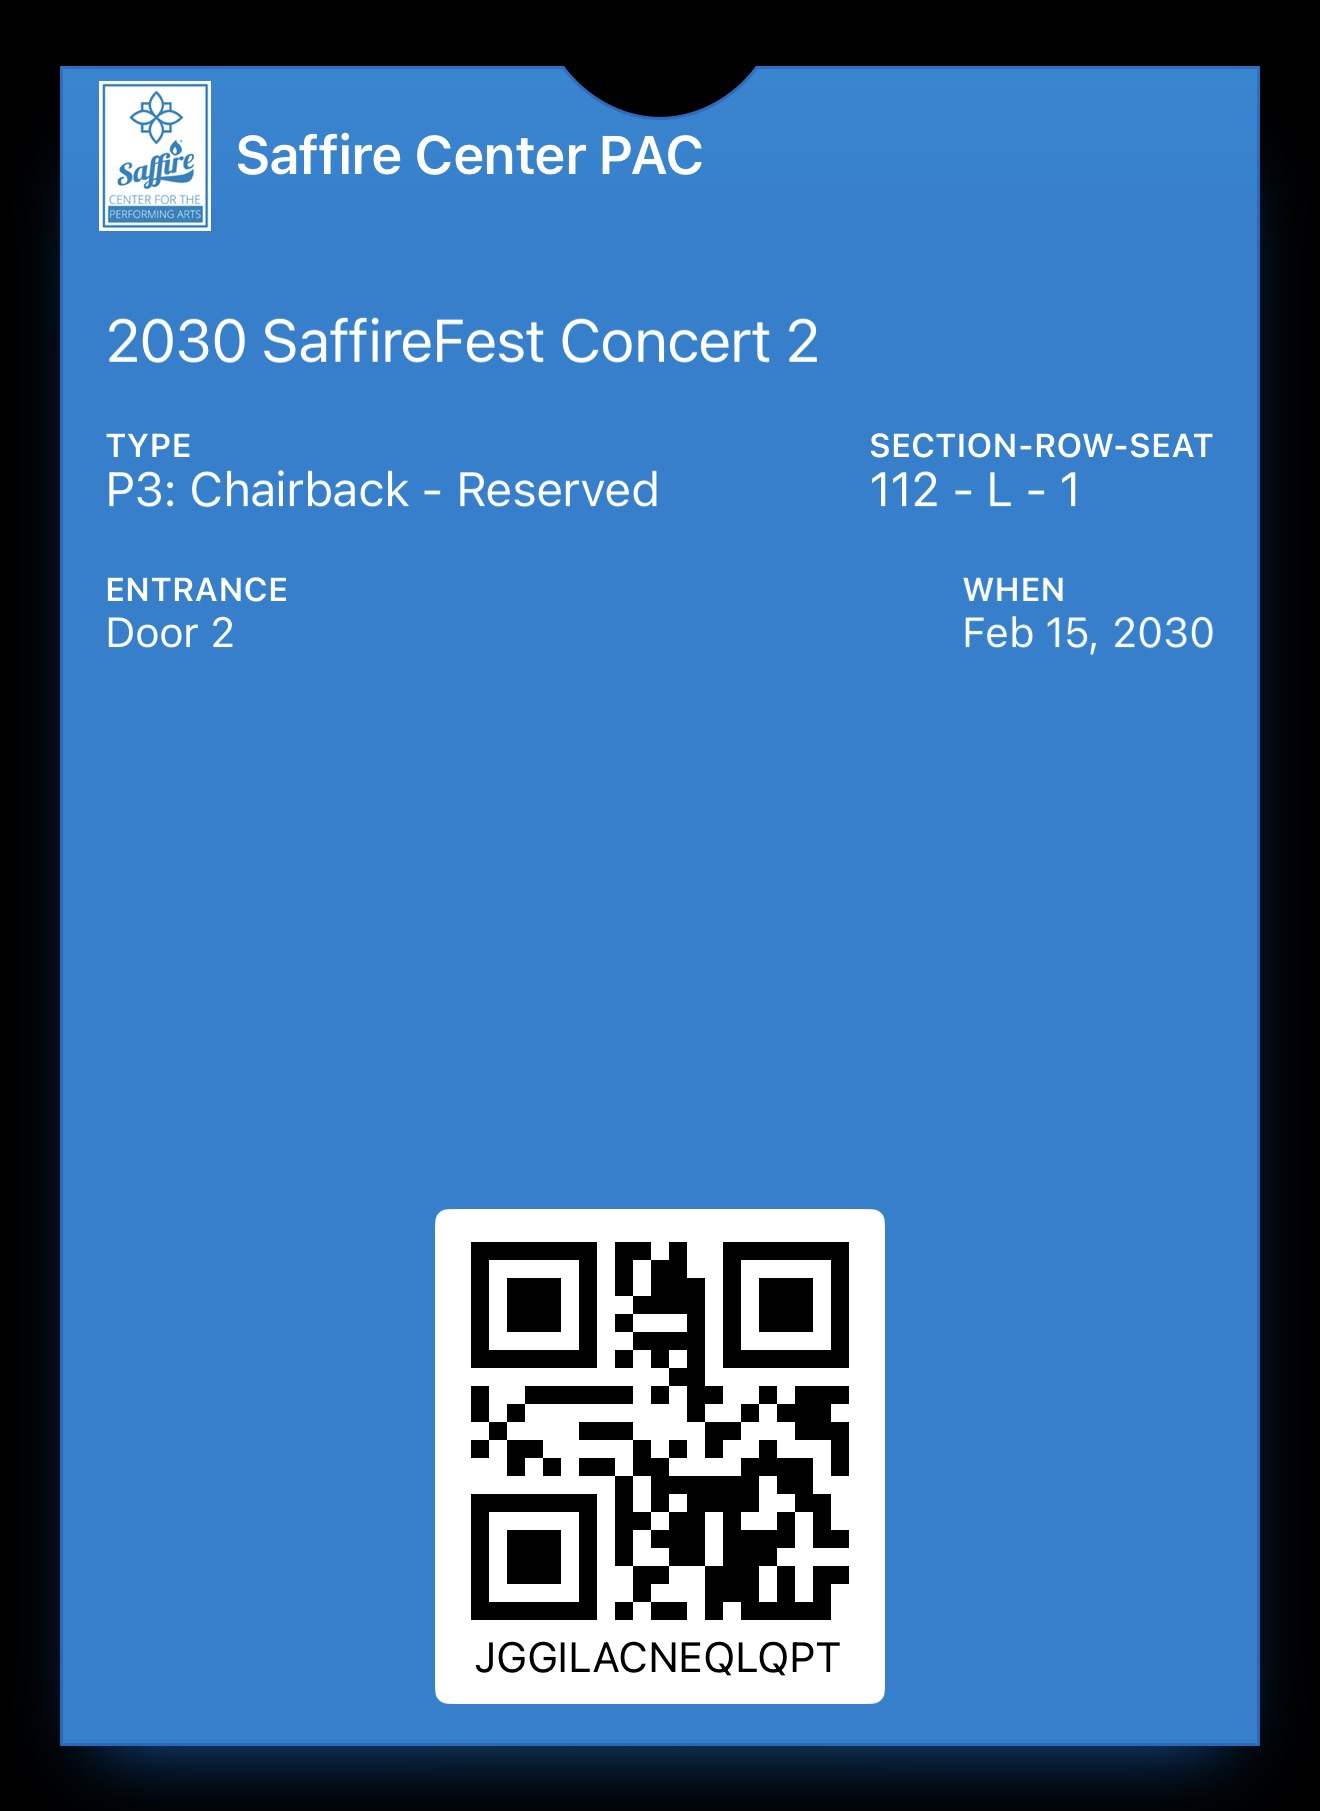
Hint: If you have any questions about the use cases for this feature or wish to discuss if it will work for you, reach out to your Ticket Account Manager or our Support team by emailing us at support@saffire.com
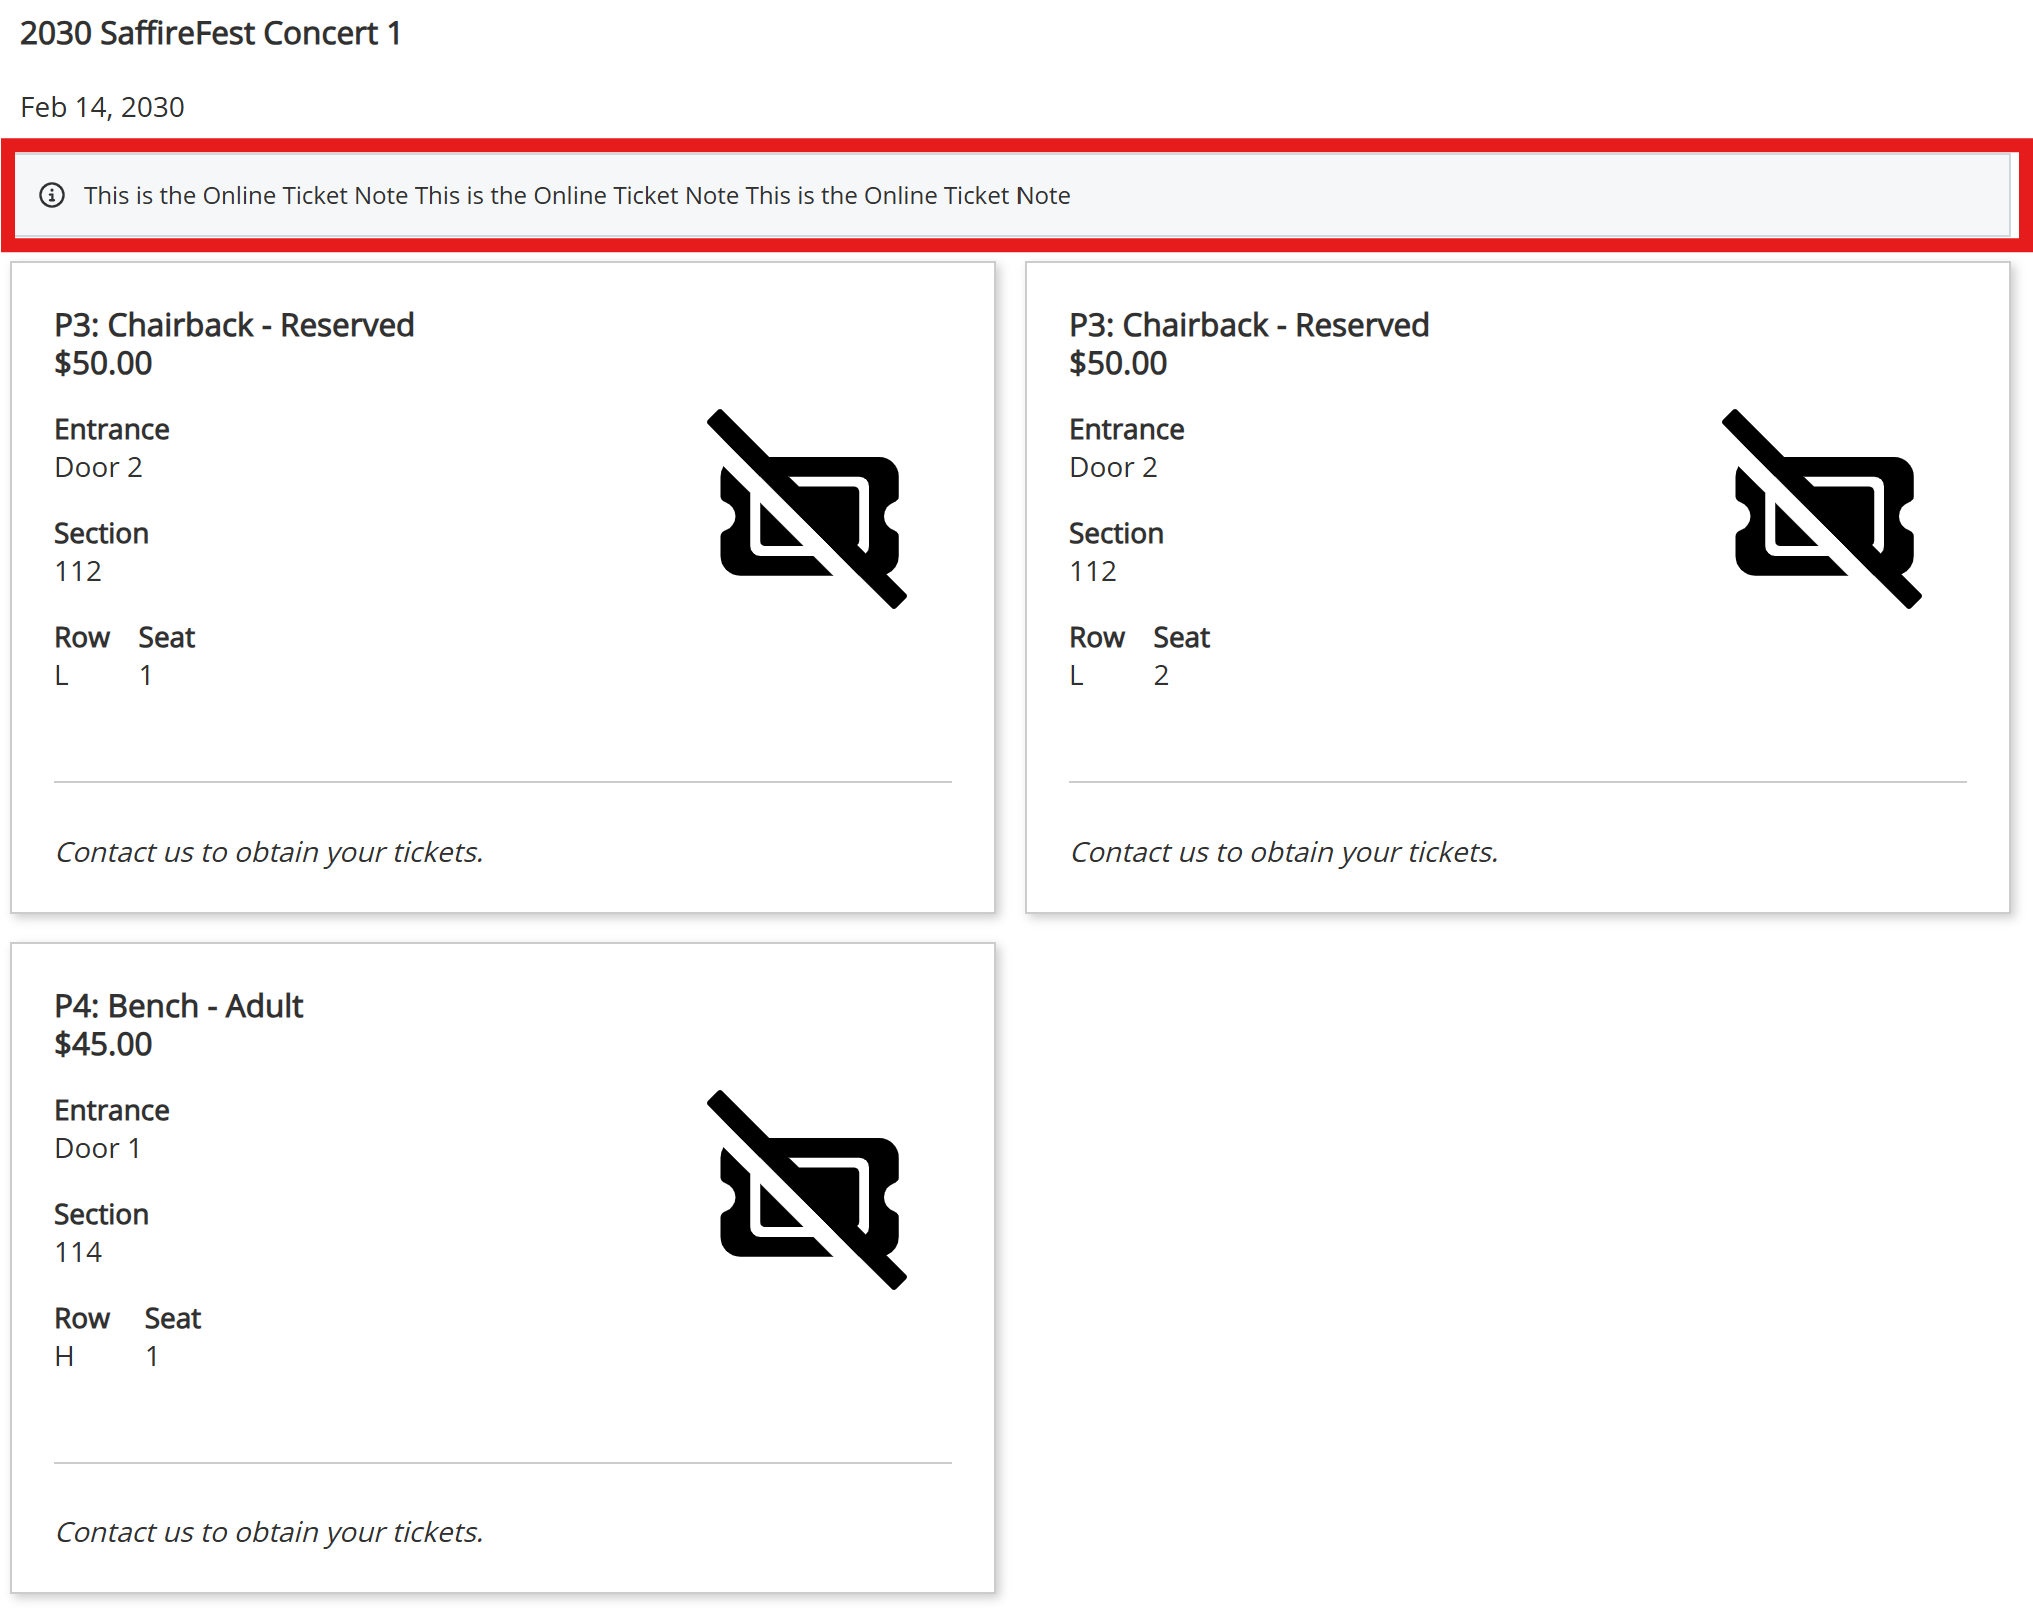
Ticket Note visible on Landing Page
We are now displaying the Online Ticket Note on the Ticket Landing Page. Because this note is unique for each product, we will display it once under the product name and date, before the individual tickets on the order.
Use the Ticket Note to express information that may be necessary to your customers; such as what this ticket includes or does NOT include, Ticket Sponsors names, or inform your customers about your re-entry policy. The possibilities are endless!
Other Improvements
- Improved Purchase Policy Control
- Moved to Commerce Settings page so it's all in a singular location
- 3DS Improvements
- Updates that keep your transactions secure and authenticated